How to Use Silhouette Cameo 4
To use a Silhouette Cameo 4, set it up, load the mat, set the AutoBlade, and send the cut from Studio software. How to use Silhouette Cameo 4 well comes down to matching material, blade depth, and mat grip for each job.
On this page (10 sections)
- What is a Silhouette Cameo 4 used for?
- How to use Silhouette Cameo 4 for first setup
- How do you load a mat and material correctly?
- How to use Silhouette Cameo 4 with the AutoBlade
- What is print and cut on a Cameo 4?
- How do you sketch, emboss, and cut fabric?
- What settings fix common Cameo 4 cutting problems?
- How do you care for a Cameo 4 between jobs?
- When should you choose a Cameo 4, Cameo 5 Alpha, or Portrait 3?
- How to use Silhouette Cameo 4 for your next project
To use a Silhouette Cameo 4, set it up, load the mat, set the AutoBlade, and send the cut from Studio software. How to use Silhouette Cameo 4 well comes down to matching material, blade depth, and mat grip for each job.
Use the same routine for every job. Place the machine on a firm flat surface, load a clean mat straight, and choose the exact material in Studio.
That routine prevents most crooked cuts and torn edges.
What is a Silhouette Cameo 4 used for?
A Cameo 4 cuts vinyl, paper, cardstock, heat transfer, and fabric for decals, stickers, shirts, and home decor. It also sketches and embosses with the right tool in the carriage.
You design in Silhouette Studio, place material on a cutting mat, load the mat, and send the job. The AutoBlade sets cutting depth for the material you select.
That is the core workflow for most owners.
The machine suits crafters who want one tool for several materials. It is not a printer.
It cuts and sketches designs, but printed color comes from your separate printer. Print and cut work joins those two steps.
If you are comparing generations, what is a silhouette cameo 3 explains how the earlier model handled the same basic tasks. The mat, blade, and software routine still drives results on the Cameo 4.
How to use Silhouette Cameo 4 for first setup
For first setup, place the machine flat, connect power and computer, load the AutoBlade, and register Studio software. Keep mats and tools nearby for smooth loading.
Set the machine on a firm desk or table that will not wobble. Leave clear space in front for the mat to feed in and out, plus room behind for long sheets.
Plug in the power adapter, then connect the USB cable to your computer. Turn the machine on and wait until it is ready before opening Studio.
Load the AutoBlade into the carriage until it seats firmly. Sketch pens need an adapter, and other tools need their own holders.
Do not force a tool that does not sit flat.
Register Studio software and confirm the machine name appears in the send panel. Keep spare mats, weeding tools, and blades close, and keep the work surface clean to limit dust on sticky mats.
How do you load a mat and material correctly?
Load the mat straight, smooth the material flat, and align the top edge with the guides. How you load the mat decides whether the cut tracks straight or drifts.
Place material with the top edge even with the top guide line. Smooth from the center out, and skip wrinkled, wet, or curled material because it can tear.
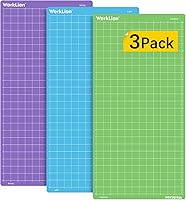
Match mat grip to the sheet. Thin vinyl needs light hold, cardstock needs firm hold, and fabric usually needs a fabric mat.
Insert the mat so both sides feed evenly, and watch it as it loads. If it enters at an angle, unload and reload, since a crooked start rarely corrects itself.
How to use Silhouette Cameo 4 with the AutoBlade
Use the AutoBlade setting that matches your material, then test the depth on a small shape. The AutoBlade adjusts from Studio, so material choice matters more than manual dials.
Select the exact material type before sending the job. Vinyl, cardstock, heat transfer, and fabric each need different depth and force.
Run a small test cut in a corner first. Look for a clean edge with no tearing or deep grooves in the backing, and change one setting at a time if it fails.
Replace the blade when cuts look fuzzy or drag. Compare Cameo replacement blades.
Keep it clean and dry, and store it with the tip protected from dust.
The Cameo 5 Alpha lists the AutoBlade with a cutting mat and sketch pen adapter. If you plan to upgrade, silhouette cameo 5 alpha reviews compare that model against the current line.
What is print and cut on a Cameo 4?
Print and cut means your printer prints the design and the Cameo 4 cuts around it using registration marks. Accuracy depends on print size, mat alignment, and mark reading.
Print the design from Studio with registration marks on the page. Do not scale the print afterward, and check the sheet size against the paper size set in Studio.
Load the printed sheet printed side up and align the marks with the mat guides. Smooth the sheet without covering the marks so the machine can scan them.
Use the 4-point registration system where your model supports it. Extra marks help correct vertical and horizontal placement.
If the machine cannot find the marks, check for glare, faint prints, or a sheet loaded upside down. Print and cut works best for stickers, labels, and heat transfer designs with a clear border.
Keep a light border around the design and test one sticker before cutting a full sheet.
How do you sketch, emboss, and cut fabric?
Sketching uses a pen in the carriage, embossing uses a stylus or blade tool, and fabric needs a mat and setting that hold fibers flat. Each task changes the tool, not the basic load routine.
For sketching, load the sketch pen adapter, insert the pen, and select the pen tool in Studio. Test first, since pen pressure changes line weight on long lines.
For embossing, use the correct tool and a material that accepts a crease. Test depth on scrap, since too much pressure can tear cardstock and too little leaves a faint line.
For fabric, use a fabric mat and fabric material setting. The mat must hold the weave without adhesive transfer, and you should cut slowly and remove the piece gently.
Materials up to 3 mm thick are within the range stated for the Cameo 5 Alpha, with vinyl, paper, and fabric listed as compatible types. Always follow your own machine and tool limits for a Cameo 4 test cut.
What settings fix common Cameo 4 cutting problems?
Most problems come from the wrong material setting, a dull blade, a dirty mat, or a crooked load. Change one factor at a time and test on scrap.
If vinyl tears, lower blade depth or force slightly. If it will not cut through, raise depth or force.
If the mat will not hold the sheet, clean it as directed. Dust and fibers reduce grip, while a mat held too tightly can stretch material during weeding.
If cuts shift, reload the mat straight and confirm the rollers grip both sides. For print and cut misses, reprint at 100 percent and check mark alignment, and see the best silhouette cameo cutting mat roundup when worn mats cause repeat failures.
How do you care for a Cameo 4 between jobs?
Care means cleaning the mat, checking the blade, clearing debris, and storing tools dry. Small checks prevent most repeat faults.
Wipe the mat surface after each use and let it dry before covering it. Keep the clear cover on during storage, since dust weakens hold on the next sheet.
Inspect the blade tip under light before a detailed job. Replace it when edges look rough or cuts fuzz, and keep spare blades dry with the cap on.
Clear small bits from the carriage area and roller path with a soft brush. Paper and vinyl scraps can block movement or scratch material.
Keep the machine covered when not in use. Store mats flat, away from heat and direct sun.
If you shop for mats or tools, the best silhouette cameo bundle guide compares bundles that often include mats and tools. Compare mat size and grip type before you add extras.
When should you choose a Cameo 4, Cameo 5 Alpha, or Portrait 3?
Choose the Cameo 4 if you already own it and it cuts cleanly, choose the Cameo 5 Alpha if you want more speed and quieter operation, and choose the Portrait 3 if space matters more than width. The right pick depends on sheet size and noise.
A Cameo 4 owner who needs only routine vinyl and cardstock cuts may not need a new machine. Fresh blades, clean mats, and correct settings often fix the problem.
Upgrade when width, speed, or noise blocks real jobs.
The Silhouette Cameo 5 Alpha Plus has a 15 in. cutting width, speeds up to 400 mm/s, and a Power Slide Lid that opens and closes automatically. The standard Cameo 5 Alpha has a 12 in. x 24 in. active surface area and runs with ultra-quiet cutting power.
Those specs suit owners who cut larger sheets or work in shared rooms.
For a smaller footprint, how to use silhouette portrait 3 covers the compact model. Portrait machines suit stickers and small decals, while Cameo models suit wider vinyl and cardstock.
If you compare the full craft cutting machines category, note that mat size, blade system, and software are the main differences. Brands differ, but the load, set, test, and cut routine stays similar.
How to use Silhouette Cameo 4 for your next project
Use this closing routine: clean mat, correct material setting, test cut, then full cut. That order protects material and saves time on every job.
Pick the material, load the mat straight, set the AutoBlade, and run a test. Weed or peel the test before you send the full design.
If the test edge is clean, send the full cut and unload the mat before you handle the sheet.
For your next machine choice, use how to use silhouette cameo 5 to see how the newer workflow changes. The steps overlap, but speed, registration, and tool handling differ enough to learn before you buy.
Frequently asked questions
What is a Silhouette Cameo 4 used for?
A Silhouette Cameo 4 cuts vinyl, paper, cardstock, heat transfer, and fabric for decals, stickers, shirts, and home decor. It also sketches and embosses with the right tools.
You design in Studio software, load material on a mat, and send the job to the machine.
Do I need a cutting mat for Cameo 4?
Yes, most flat materials need the cutting mat. The mat holds the sheet flat so the blade can track straight.
Check that the mat grip matches the material, and replace a mat when it no longer holds work evenly.
What is the AutoBlade on a Cameo 4?
The AutoBlade adjusts blade depth from the software setting. It reduces manual dial changes between thin vinyl and thicker cardstock.
Match the material setting in Studio to the sheet you loaded, then check the first cut.
Can a Cameo 4 do print and cut?
Yes, a Cameo 4 can cut printed designs by reading registration marks. Print the design with marks, check the printed size, then align the sheet on the mat.
The machine uses the marks to place cuts around the printed image.