How to Choose an Automatic Hat Heat Press
The right automatic hat heat press gives you repeatable pressure, a curved platen that supports the cap, and controls that match your transfer material. Check the platen fit and working space before comparing automation features.
On this page (13 sections)
- What should you check first in an automatic hat heat press?
- Why does curved platen fit matter?
- How important is automatic pressure?
- What temperature and timer controls do you need?
- How should you prepare a cap before pressing?
- Which product helps with the wider decoration workflow?
- Should you choose an automatic press or a manual hat press?
- Do you need top and bottom heat for hats?
- How do attachments change a flat heat press?
- How should you set up a cap pressing station?
- How do you care for the platen and cap support?
- What mistakes should you avoid?
- How do you choose the right automatic hat heat press?
The best automatic hat heat press combines repeatable pressure, a curved platen that fits the cap crown, and clear time and temperature controls. For repeated decoration, those details matter more than the word automatic by itself.
A cap is not a flat shirt panel. Its crown curves away from the brim, seams can create high spots, and the usable design area is smaller than the front of the hat.
A machine that presses evenly on a flat garment may not give the same result on a cap.
Start with our broader heat press machine buying guide if you are still comparing press types. Then use the checks below to decide whether an automatic heat press hat setup suits your work.
What should you check first in an automatic hat heat press?
Check the curved platen fit and pressure path before the automation controls. A timed cycle is useful only when the cap sits securely and the decoration area receives even contact.
Look for these points:
- A curved platen made for the cap shape.
- Enough clearance for the crown and brim.
- Pressure that can be adjusted for different materials.
- A timer that supports the transfer instructions.
- Temperature control that covers the required setting.
- A work area that lets you place the cap without touching a hot surface.
- A cycle or release system that makes repeated jobs easier to manage.
The phrase automatic heat press for hats can describe different designs. Some machines automate the pressing cycle, while others rely on a manual lever with digital time and heat controls.
Compare the actual controls instead of assuming every automatic heat press hat machine works the same way.
Why does curved platen fit matter?
A curved platen supports the part of the hat where the design will sit. If the crown does not contact the platen evenly, the transfer can receive uneven heat or pressure.
Before choosing a machine, identify the cap styles you plan to decorate. A structured baseball cap, a soft unstructured cap and a thicker front panel may not sit the same way.
The crown height, seam position and brim shape can all change the usable area.
The platen should support the design area without forcing the crown into an awkward fold. You also need enough room to position the cap while keeping the brim and other sections clear of the heated surface.
A curved platen does not make every cap identical. Test the fit with the cap style you expect to use most often, and keep the decoration inside the supported area.
If you are comparing machines with heat on both surfaces, read our guide to a top and bottom heat hat press. That setup can change how you think about contact on the front and back of a cap.
How important is automatic pressure?
Automatic pressure is useful when you need similar force from one cap to the next, but it should remain adjustable. Different crown thicknesses and transfer materials may need different pressure.
Too little pressure can leave parts of a design without full contact. Too much pressure can flatten the cap, mark the fabric or make placement harder.
The ideal setting depends on the cap, transfer and platen shape.
A repeatable cycle can help when you are decorating a batch. It reduces the number of manual steps, so you can focus on cap placement and transfer alignment.
It does not remove the need to check each cap before pressing.
Look for controls that make the pressure setting understandable. If you cannot tell how the machine changes pressure, it may be harder to repeat a successful setup.
What temperature and timer controls do you need?
Choose a machine with temperature and time controls that cover your transfer material's instructions. The correct setting belongs to the transfer and fabric combination, not to the press alone.
A digital timer helps you repeat the same dwell time across a batch. Temperature control helps you set the heat required by the transfer instructions.
These controls are useful even when the press is not fully automatic.
The Fancierstudio model below has electronic time and heat control, a temperature range of 0 to 699 degrees F and a time range of 0 to 999 seconds. Those ranges are broad, but you should still follow the instructions for the material you are pressing.
Do not choose a setting because it worked for a different cap. Fabric content, transfer type and the thickness of the front panel can change the result.
How should you prepare a cap before pressing?
Prepare the cap by checking the decoration position, smoothing the front panel and keeping seams out of the main transfer area. Good preparation helps the platen make full contact.
Place the cap on the curved support and check the design from the front. For model-specific steps, see HTVRONT hat press steps.
Make sure the design is centered for the look you want, then confirm that the crown sits flat against the pressing surface.
Keep the brim out of the way if the platen design requires it. Avoid forcing the cap into position because that can change the shape of the crown or move the design before the cycle starts.
If you are using a transfer, secure it according to its instructions. The transfer should not slide when the platen closes, but any tape or covering must also be suitable for the heat process.
For a complete process overview, use our guide on how to heat press a hat. It covers the general placement and pressing decisions that apply before you choose a machine.
Which product helps with the wider decoration workflow?
An automatic hat heat press is the main tool for applying transfers to caps, but some projects begin with screen printing. The products below fit different parts of that workflow, so choose them only when their stated features match your project.
Fancierstudio Digital Heat Press 15 x
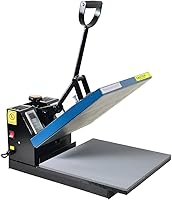
The Fancierstudio is a 15-by-15-inch digital heat press with electronic time and heat control. It has a 110-volt, 1800-watt design, a silicon-gel base board, adjustable pressure and a Teflon-coated heat platen.
Its 15-by-15-inch pressing surface is larger than the front panel of a typical cap, so it is not automatically a dedicated hat press. The relevant question is whether your setup includes a suitable curved hat attachment and whether the pressure path supports the cap.
The machine has an upward-opening design, which can help when you need to work around the press footprint. Its time range runs from 0 to 999 seconds, and its temperature range runs from 0 to 699 degrees F.
The included 15-by-15-inch heat press sheet and Teflon coating are relevant to general heat-press work. For hats, focus first on the curved support and safe cap placement.
Choose this model if you need a general heat press for transfers, garments, bags or mouse mats and plan to confirm the correct hat setup separately. A dedicated automatic hat heat press may be a better fit if most of your work is caps.
Speedball Fabric Screen Printing Ink Starter Set
The Speedball set is screen-printing ink rather than a heat press, but it can suit buyers who create fabric designs before using heat to set them. It includes 6 colors, with 4 fluid ounces each of black, white, red, yellow, blue and green.
The water-based colors can be used as supplied or mixed to create other colors. Speedball describes the ink as suitable for cotton, canvas, polyester, blends, linen, rayon and other synthetic fibers, plus paper and cardboard.
It is not for nylon.
The ink is water soluble and cleans up with soap and water. Speedball describes it as permanent after heat setting, so the heat step is part of the process rather than a reason to skip the ink instructions.
This set makes more sense for screen-printing a design onto a compatible fabric than for applying a ready-made heat-transfer film. Choose it when you need several basic colors and a water-based screen-printing workflow.
Caydo 23 Pieces Screen Printing Starter Kit, 3 Wood Frames with Mesh
The Caydo kit is a 23-piece screen-printing starter set with 3 wood frames and mesh. The frames measure 10 x 14 in, 8 x 12 in and 6 x 10 in, and the kit includes 2 screen-printing squeegees.
The kit includes A4 inkjet transparency film, an ink knife, 2 plastic scrapers, masking tape, 10 wood mixing sticks, a glove and instructions. The frame sizes give you different working areas for different designs.
Caydo describes the kit for printing patterns on T-shirts, canvas tote bags and tank tops. A cap project needs extra care because the crown is curved, so check whether the frame and cap can be supported during printing.
This kit does not replace an automatic heat press. It helps create a screen-printed design, while the heat press provides the heat-setting step when the ink instructions require it.
Choose it if you want to create screen-printed artwork and already understand that curved caps need careful support. Choose a transfer-focused setup if your main goal is fast, repeatable cap decoration.
Should you choose an automatic press or a manual hat press?
Choose an automatic press when repeatability and reduced manual effort matter more than the lowest equipment cost. Choose a manual press when you want direct control and expect smaller batches.
An automatic cycle can help keep the process consistent across a run. It may also reduce the effort needed to repeat the same action many times.
The usefulness depends on how clearly you can set pressure, time and temperature.
A manual hat press can be easier to understand because you control the closing motion directly. It may suit occasional projects where speed and cycle repeatability are less important.
Compare the full workflow:
| Need | Automatic hat heat press | Manual hat press |
|---|---|---|
| Repeated batches | Useful when cycles are consistent | Requires more repeated manual action |
| Pressure control | Look for adjustable, repeatable pressure | You control the closing force |
| Placement | Still requires careful cap alignment | Still requires careful cap alignment |
| Best fit | Regular cap decoration | Occasional or lower-volume work |
| Main risk | Assuming automation fixes poor fit | Inconsistent pressure between caps |
Neither design removes the need for a cap-specific platen. A machine with a repeatable cycle can still produce poor results if the crown is not supported.
Do you need top and bottom heat for hats?
Top and bottom heat can help when both sides of the material need controlled contact, but it is not automatically necessary for every cap project. Decide based on the transfer material and the part of the cap you are decorating.
A front design usually needs a supported crown and a heated surface that reaches the transfer area. Additional heat from below may be useful for some workflows, but it also changes the heat exposure of the cap.
Check the instructions for your transfer or ink before choosing a two-sided system. The correct process depends on the material, fabric and required heat-setting method.
If you want to compare two-sided hat pressing, read How to Choose a Hat Press with Top and Bottom Heat. Keep the platen fit as the first filter.
How do attachments change a flat heat press?
A hat attachment can turn a general press into a more cap-focused setup, but the attachment must match the machine and support the crown correctly. Confirm the attachment's size, mounting method and pressure path before buying.
The Fancierstudio model has a 15-by-15-inch flat pressing area, adjustable pressure and a Teflon-coated heat platen. Those facts describe the general press, not a dedicated curved hat platen.
An attachment may be useful when you already need a general heat press for shirts, bags or other flat items. It may be less practical if you only decorate hats and want a machine designed around cap placement.
Read our guide to the best hat press attachment for a heat press before treating a flat press as a hat solution. Check compatibility with the exact press model and make sure the attachment leaves enough clearance for the crown and brim.
How should you set up a cap pressing station?
Set up the station with a stable work surface, clear access around the press and a place to position caps before the cycle begins. Keep transfers, caps and protective materials within reach without crowding the heated area.
Use a layout that separates the unpressed and finished caps. This helps prevent a completed cap from being mixed with one that still needs a transfer or heat-setting step.
Keep the control panel visible. You should be able to check time and temperature without reaching over the heated platen.
Leave room for the cap's brim and crown. A crowded table can push the brim against another object or make it harder to close the press evenly.
Read the instructions for the press before the first use. Pay attention to heat warnings, pressure adjustment and cleaning directions.
How do you care for the platen and cap support?
Care for the press by keeping the platen clean, protecting the pressing surfaces and checking the cap support before each batch. Residue can transfer to later projects, while a damaged support can affect contact.
Allow the heated parts to cool according to the machine instructions before cleaning. Use only cleaning methods suitable for the platen coating and the materials used in your workflow.
The Fancierstudio model has a Teflon coating on the heat platen. That coating is part of the stated design, but it does not remove the need to keep the platen free of transfer residue.
Check that the curved support remains secure and smooth. A loose or damaged support can change the cap position during pressing.
For protective sheets, see are Teflon sheets for heat press reusable. Use a sheet only when it suits the transfer process and remains clean enough for the next project.
What mistakes should you avoid?
Avoid choosing an automatic hat heat press by cycle speed alone. The most common buying mistake is ignoring the cap's curve, seam position and supported design area.
Also avoid these errors:
- Assuming a flat platen will press a curved crown evenly.
- Using one temperature and time setting for every transfer.
- Pressing over a thick seam without checking the contact.
- Placing the design too close to the brim.
- Treating automatic pressure as a substitute for correct cap placement.
- Ignoring clearance around an upward-opening press.
- Choosing a screen-printing kit when you actually need a ready-made transfer workflow.
- Skipping a test piece when the transfer instructions allow one.
A small setup mistake can affect every cap in a batch. Confirm the placement and pressing process before repeating it across multiple pieces.
How do you choose the right automatic hat heat press?
Choose the machine by matching the platen to your cap shape, the pressure system to your batch size and the controls to your transfer instructions. Then check the work area, attachment compatibility and cleaning needs.
Pick a dedicated automatic hat press if most of your work is cap decoration and you want a repeatable cycle. Pick a general press such as the Fancierstudio when you also need a 15-by-15-inch surface for flat items and can confirm a suitable hat attachment.
Choose the Speedball set when you want water-based screen-printing ink in 6 colors for compatible fabric. Choose the Caydo kit when you need frames, squeegees, transparency film and other tools to create screen-printed designs before heat setting.
The best automatic heat press for hats is the one that supports the crown evenly and lets you repeat the correct process. Automation helps after those basic fit and control decisions are right.
Frequently asked questions
What makes an automatic hat heat press different?
An automatic hat heat press uses controls or a cycle system to make repeated pressing more consistent. The key buying checks are still the curved platen, cap fit, adjustable pressure, temperature range and timer.
Automation cannot correct a platen that does not support the crown or brim.
Can I use a flat heat press for hats?
A flat heat press can work for some hat projects with a suitable attachment, but a curved hat platen usually supports the cap crown more evenly. Check the attachment size, pressure path and clearance before choosing a flat machine for repeated hat decoration.
What temperature should I use for a hat transfer?
Use the temperature, time and pressure recommended for your specific transfer material. Hat fabric, transfer type and platen shape all affect the result, so do not copy one setting across every project.
Start with a test cap or scrap material when the transfer instructions allow it.
Is automatic pressure useful for decorating many caps?
Automatic pressure can make repeated cap decoration easier because each cycle can follow the same basic process. It does not replace correct cap placement or platen fit.
You still need to check that the design sits flat, the crown is supported and the pressure reaches the transfer area.