How to Use Cricut EasyPress SE
To use the Cricut EasyPress SE, set the time and temperature, preheat the blank, press with steady pressure, and follow the transfer material's instructions. Let the project cool as directed before removing its liner.
On this page (9 sections)
- What do you need before using Cricut EasyPress SE?
- How do you set the Cricut EasyPress SE controls?
- How should you prepare the blank?
- How do you press with Cricut EasyPress SE?
- When should you peel the transfer?
- Which products can help with heat-transfer work?
- How do you avoid common EasyPress SE mistakes?
- How do you care for the Cricut EasyPress SE?
- What should you choose for your next project?
To use the Cricut EasyPress SE, set the recommended temperature and time, prepare a firm pressing surface, preheat the blank if required, and press with steady pressure. Keep the EasyPress SE flat and still during the timer cycle, then cool and peel the transfer according to its instructions.
The EasyPress SE is a handheld heat press, so accurate setup matters more than speed. Read the instructions for your heat-transfer vinyl, Infusible Ink, or other material before choosing the controls.
What do you need before using Cricut EasyPress SE?
You need the EasyPress SE, a suitable blank, the transfer material, and a stable, heat-resistant pressing surface. A pressing mat helps protect the table and gives the project a consistent base.
Our guide to the heat press machine explains the basic differences between handheld presses and larger machines. If you need a smaller tool for travel or tight work areas, compare the best portable heat press machine options.
Measure the design and blank before heating anything. Leave enough room around the design for the EasyPress SE plate to sit fully over the transfer.
Keep the work area clear of children, pets, loose fabric, and heat-sensitive objects. The press and its plate become hot during use, so place it on its safety base whenever you are not pressing.
How do you set the Cricut EasyPress SE controls?
Set the temperature and timer to the values recommended for your material and blank. The correct combination is not the same for every project.
Turn on the EasyPress SE and use its controls to choose the temperature. Set the timer for the required pressing time, then wait for the press to reach the selected temperature before starting.
Do not guess based only on the material name. A transfer applied to cotton may use different settings from one applied to polyester, and layered designs may need a different process.
For sublimation, see Cricut heat press settings for more specific guidance.
The controls are useful only when they match the transfer instructions. If the material manufacturer gives a temperature range, use the setting that fits the blank and the recommended technique.
How do the temperature and timer work together?
Temperature controls how hot the plate becomes, while the timer controls how long the press applies heat. Both settings affect the transfer, so changing one without checking the instructions can lead to poor adhesion or damage.
Use the timer as a repeatable guide. Start it only after the EasyPress SE is positioned correctly over the design.
Avoid pressing for extra time simply because the transfer looks unchanged. If the design does not adhere, check the pressure, surface, temperature, and material instructions before repeating the press.
How should you prepare the blank?
Prepare the blank by making sure it is clean, dry, and free of wrinkles where the design will sit. Place it flat on the pressing mat and smooth the fabric without stretching it.
Preheat the blank only when the transfer instructions call for it. A short preheat can remove moisture and wrinkles, but the correct method depends on the material and blank.
Position the design with the carrier sheet or protective layer facing the required direction. Check the placement before heating because the design can become difficult to move after pressing.
For shirts and other fabric blanks, place the design on a firm, single layer when possible. Seams, zippers, pockets, and thick edges can prevent even contact.
How do you press with Cricut EasyPress SE?
Place the EasyPress SE over the full design, apply steady pressure, and keep it still until the timer ends. Do not slide the press across the design unless the material instructions specifically allow that method.
Hold the handle securely and keep your fingers away from the hot plate. Make sure the entire design is covered, or divide the design into sections with a small overlap when the project requires more than one position.
Use the pressure recommended for the transfer material. Too little pressure can leave parts of the design loose, while excessive pressure can flatten or shift some materials.
When the timer ends, lift the press straight up and return it to the safety base. Do not drag the hot press across the blank or place the hot plate directly on the table.
For a detailed comparison of pressing surfaces, see our guide to the best Cricut EasyPress pressing mat. The mat should support the blank without creating a soft, uneven base.
When should you peel the transfer?
Peel only at the stage recommended by the transfer material. Some materials need a warm peel, while others need to cool before the carrier sheet is removed.
Lift one corner carefully instead of pulling the entire sheet quickly. If the design lifts with the carrier, lay the sheet back down and press again only if the material instructions permit it.
Do not touch the plate or freshly pressed area with bare hands while it is hot. Allow the blank to cool on the pressing surface before handling it further.
After peeling, inspect the edges and fine details. If a small area has not adhered, cover it with the required protective layer and repeat the recommended press.
Which products can help with heat-transfer work?
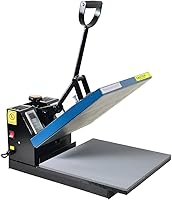
A larger press can suit projects that need a broad, even pressing area. The Fancierstudio Digital Heat Press 15 x has a 15-by-15-inch heat press sheet, 110-volt operation, 1,800 watts, electronic time and heat control, adjustable pressure, a silicon-gel base board, and a Teflon-coated heat platen.
Its 15-by-15-inch area is much larger than a handheld press, so it can cover broad designs with fewer repositioning steps. The 0–699°F temperature range and 0–999-second time range give you adjustable controls, but you should still follow the transfer material's instructions.
Choose this type of press if you have a stable workspace and regularly apply larger designs. A handheld EasyPress SE is easier to lift and move, while this Fancierstudio model is better suited to projects where coverage and adjustable pressure matter.
Screen printing is a different process from heat-transfer vinyl, but fabric ink can help when you want to print designs through a screen. The Speedball Fabric Screen Printing Ink Starter Set includes 6 colors, with 4 fl oz each of black, white, red, yellow, blue, and green ink.
The water-based ink is water soluble and cleans up with soap and water. It is intended for cotton, canvas, polyester, blends, linen, rayon, other synthetic fibers, paper, and cardboard, but not nylon.
Choose it when your project calls for screen printing rather than a heat-applied transfer. Heat setting is part of the ink process, so follow the ink's instructions instead of using the EasyPress SE settings for vinyl.
A screen-printing frame and squeegee set can help you create designs before heat setting the ink. The Caydo 23 Pieces Screen Printing Starter Kit, 3 Wood Frames with Mesh includes 10-by-14-inch, 8-by-12-inch, and 6-by-10-inch wood frames with mesh, plus 9.4-inch and 5.9-inch squeegees.
The larger squeegee can cover the full screen, while the smaller one suits single-handed work on smaller patterns. The kit also includes 5 A4-size inkjet transparency films, 10 wood mixing sticks, a glove, instructions, 2 plastic scrapers, and masking tape.
Choose this kit for screen-printing designs on T-shirts, canvas tote bags, and tank tops. It complements fabric ink, but it does not replace the EasyPress SE because the two tools serve different parts of the process.
How do you avoid common EasyPress SE mistakes?
Avoid four common problems: using the wrong temperature, pressing on an unstable surface, moving the press during the timer, and peeling at the wrong stage. Each can affect adhesion even when the design is positioned correctly.
Do not place the EasyPress SE directly on an unprotected table or soft bed. A firm, heat-resistant mat supports the blank and reduces the chance of uneven pressure.
Do not stretch the fabric while pressing. Let the blank rest naturally on the mat so the design does not shift when the fabric returns to its normal shape.
Do not stack extra layers under the design unless the transfer instructions allow them. Pockets, seams, and thick fabric can change the pressure and heat reaching the transfer.
If you prefer a different handheld model, our guide to how to use Cricut EasyPress 3 covers another EasyPress workflow. For very small designs, see how to use Cricut EasyPress Mini and check how its smaller plate changes positioning.
How do you care for the Cricut EasyPress SE?
Care for the EasyPress SE by letting it cool fully before storage and keeping the plate free of transfer residue. Unplug it when the work is finished and follow the manufacturer's cleaning instructions.
Never scrape the hot plate with a sharp tool. If adhesive or material sticks to the plate, allow it to cool and use only a cleaning method approved for the press.
Store the press where the plate will not touch fabric, paper, plastic, or other heat-sensitive items. Keep the cord arranged so it does not pull the press from its base.
A clean pressing mat also matters. Remove loose fibers and scraps after each project, and replace the mat if it becomes damaged or no longer supports the blank evenly.
What should you choose for your next project?
Choose the Cricut EasyPress SE when you want handheld control for heat-transfer projects and can follow the material's temperature, time, pressure, and peeling instructions. Use a larger digital press when a 15-by-15-inch work area and adjustable pressure better match your projects.
Choose Speedball ink and the Caydo frame kit when you are making screen-printed designs rather than applying heat-transfer vinyl. If you want a ready-made setup with several tools together, compare the best heat press bundle before choosing your equipment.
The safest routine is simple: prepare the blank, confirm the recipe, set the controls, press on a firm surface, and let the project cool as directed. That process gives the Cricut EasyPress SE the best chance of producing an even transfer without unnecessary reheating.
Frequently asked questions
How do you use the Cricut EasyPress SE?
Set the temperature and time for your transfer material, preheat the blank if the instructions call for it, and place the EasyPress SE on a firm pressing surface. Apply steady pressure for the recommended time, then follow the material instructions for cooling and liner removal.
What temperature should I use with Cricut EasyPress SE?
Use the temperature recommended for your specific heat-transfer vinyl, Infusible Ink, or other material. The correct setting depends on the material, blank, and pressing method, so use the material manufacturer's time and temperature guide instead of guessing.
Do you need a pressing mat for Cricut EasyPress SE?
A heat-resistant pressing mat gives you a firm, protected surface for pressing. Choose a mat designed for heat-transfer work and large enough for the EasyPress SE area, then place it on a stable table away from heat-sensitive materials.
How long should you press with Cricut EasyPress SE?
Press for the time recommended by the transfer material's instructions. Time changes with the material, blank, layers, and whether you need a preheat or second press, so the EasyPress SE timer should follow that project recipe.