How to Set a Cricut Heat Press for Sublimation
For sublimation Cricut heat press settings, set the press to the blank maker's recommended temperature and time, use medium to firm pressure, and press once with the transfer face down. Prepress the blank briefly, let it cool slightly if needed, then peel or lift the sheet as the ink supplier directs.
On this page (10 sections)
- What temperature should you set for sublimation on a Cricut press?
- How long should you press a sublimation transfer?
- What pressure setting works best for sublimation blanks?
- How do you prepress a sublimation blank before pressing?
- How do you line up a sublimation transfer on a shirt?
- Which Cricut press size suits sublimation work?
- How do you fix common sublimation press problems?
- Can you use screen printing ink with a heat press?
- What sites and guides should you check before your first press?
- Final settings checklist for a clean sublimation press
For sublimation Cricut heat press settings, start with the blank maker's temperature and time, use medium-firm pressure, and keep the transfer in close contact for one full press. Your exact numbers depend on the blank, not on the press brand alone.
A Cricut press and a clamshell press use the same basic logic. Heat drives the ink into the fibres or coating, pressure keeps every part of the design in contact, and time gives the ink enough contact to move.
Change one variable at a time when you test.
If you are new to sublimation printing, our guide to What Settings Should I Use for Sublimation Printing? covers printer profiles and paper settings. This guide covers the press side of the job.
What temperature should you set for sublimation on a Cricut press?
Use the temperature range printed for your blank, often around 380 to 400°F for polyester fabric blanks. Do not copy a number from a video without checking your blank's label.
Fabric blanks list their polyester content and pressing range. A 100 percent polyester shirt behaves differently from a canvas tote with a coating.
Hard blanks such as aluminium panels, ceramic mugs and mouse pads carry their own instruction cards.
Start in the middle of the maker's range. Press a test piece, lift the sheet as directed, and look at colour depth and edge sharpness.
If colour looks pale, the blank may need more heat, more time, or more pressure. If colour looks scorched, reduce heat or time slightly.
Keep a simple log. Write down the blank, temperature, time, pressure and result.
How long should you press a sublimation transfer?
Press for the time listed on your transfer paper or blank card, then lift or peel at the moment that maker specifies. Time starts when the platen closes and the blank reaches heat.
Many fabric transfers need a longer press than small hard blanks. A thick tote or lined item needs more time than a thin shirt.
Set a timer rather than guessing. A short press can leave ink on the surface instead of bonding with the blank.
If the first press looks light, press again briefly. Faded or blurry edges usually point to pressure or a damp transfer rather than a short timer.
What pressure setting works best for sublimation blanks?
Use medium to firm pressure so the whole design touches the blank evenly. Too little pressure gives pale patches.
Too much can mark fabric or make peeling harder.
Cricut EasyPress models do not have a pressure dial in the same way as a clamshell press. You set pressure by how hard you press down and hold.
A clamshell press uses an adjustable knob, so turn it until the platen closes straight and firm.
Place the blank on a firm, heat-safe surface. A pressing mat helps for small presses.
For a full guide to surfaces, see our best Cricut EasyPress pressing mat picks.
Test pressure with a design that has both solid areas and fine lines. Solid areas show pale spots first.
Fine lines show blur or ink spread when the transfer shifts.
How do you adjust pressure on a clamshell press?
Turn the pressure knob in small steps and test after each change. Close the press on a blank with no transfer, open it, and check that the fabric shows an even mark.
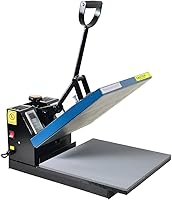
A silicon-gel base board and adjustable pressure, like those on the Fancierstudio Digital Heat Press 15 x 15 Sublimation Rhinestone Heat T-Shirt Machine15x15 B/BLK, let you fine tune contact across a 15 by 15 inch area. That size suits full shirt fronts and larger blanks without many repositions.
Check that the press sits on a sturdy table. A 33 by 23 by 20 inch footprint needs clear space to open upward without hitting a shelf.
How do you prepress a sublimation blank before pressing?
Prepress for a few seconds to remove moisture and wrinkles, then press the transfer. Moisture is a common cause of faded or patchy sublimation.
Lay the blank flat with the design area smooth. Close the press for a short prepress, open it, and let steam escape.
For a shirt, check the seams and underarm areas, since folds there can cause white lines.
Lint roll the blank after prepressing if the fabric picks up lint. Lint under a transfer can block ink and leave tiny white dots.
If your blank twists or shifts, use heat-safe tape on the back of the transfer paper or on the edges of the design. Tape keeps the sheet from moving when you close the press.
How do you line up a sublimation transfer on a shirt?
Centre the design by folding the shirt, marking the centre, or using a ruler and a heat-safe mark. Straight placement matters more than speed.
Fold the shirt lengthwise to find the centre crease, then press it flat again. Place the transfer face down and tape the top corners lightly if needed.
For text designs, measure from the collar seam to the top of the design. Many makers use about 3 to 4 inches for adult shirts, though blank style and design size change that number.
Place a protective sheet below the shirt as well as over the transfer. Ink that blows out at the edges can mark the mat or platen without a lower sheet.
Our sister guide to how to use cricut heat press for shirts walks through shirt placement step by step.
Which Cricut press size suits sublimation work?
Choose the smallest platen that covers your largest blank in one press. Repositioning a large design in sections risks visible seams and uneven colour.
A mini press suits sleeves, hats and small patches. It also works for touch-ups, but it is slow for a full front design.
Learn the small press workflow in how to use Cricut EasyPress Mini.
A 15 by 15 inch clamshell covers most adult shirt fronts in one position. It also handles tote bags and mouse pads, and its 1800 watt, 110 volt motor needs a standard outlet and clear bench space.
For occasional small blanks, compare the best portable heat press machine picks. For a broader buying overview, see our heat press machine guide.
How do you fix common sublimation press problems?
Match the fix to the symptom: pale colour, blur, scorch marks, or ghosting. Changing every setting at once hides the cause.
Pale colour can come from low pressure, too little polyester in the blank, or a damp transfer. Dry the paper, firm the pressure, and confirm the blank content before raising heat.
Blurry edges usually mean the transfer moved during pressing. More tape, a prepress, and a steady close help.
Ghosting, where a faint copy appears beside the main print, often comes from a shift or ink on a protective sheet.
Scorch marks point to heat that is too high or a press left in one spot too long. Lower the temperature slightly and keep the protective sheet clean.
If a design peels poorly, check the paper maker's peel instruction, since peeling at the wrong moment can lift ink or tear fine lines.
Can you use screen printing ink with a heat press?
Heat-set screen printing ink is a different process from sublimation, with its own curing steps. Do not treat the two inks as interchangeable.
The Speedball Fabric Screen Printing Ink Starter Set includes 6 colours in 4 fluid ounce jars: black, white, red, yellow, blue and green. Speedball says the water-based ink is permanent after heat setting and works on cotton, canvas, polyester, blends, linen and rayon.
Screen printing uses a frame and squeegee to push ink through a mesh. The Caydo 23 Pieces Screen Printing Starter Kit includes 3 wood frames in 10 x 14, 8 x 12 and 6 x 10 inch sizes, plus squeegees in 9.4 and 5.9 inches, transparency film, an ink knife, masking tape and mixing sticks.
Sublimation prints with a special printer and ink, then uses heat to dye the blank. Screen printing lays ink on top of the fabric, then heat sets it.
Both can make-shirt designs, but the equipment, inks and feel on fabric differ.
What sites and guides should you check before your first press?
Check the blank maker's instructions, your transfer paper guide, and a trusted sublimation printer guide before you press. Those three sources should agree on temperature, time and peel method.
If they disagree, trust the blank maker for heat limits. A blank can scorch or melt at a temperature that a paper maker lists for another substrate.
Our guide to What Is a Sublimation Printer? explains how the printer, ink and paper work together. Read it before you change printer profiles to fix a press problem.
Keep your test log with each order. Note the press model, since a Cricut EasyPress and a clamshell press deliver pressure differently even at the same temperature.
Final settings checklist for a clean sublimation press
Use the blank maker's temperature and time, medium-firm pressure, a short prepress, and the peel method on your paper. That order solves most first-press problems.
Pick a clamshell press when you press full shirt fronts often. Pick a mini or portable press when you press small items and need easy storage.
Adjust one setting at a time and write the result down.
Next, confirm your printer and paper settings, then run a test on the exact blank you plan to sell. A small test saves a full batch.
Frequently asked questions
What temperature and time should I use for sublimation on a Cricut heat press?
Use the temperature and time printed for your specific blank and transfer paper, since polyester blends, coated hard blanks and aluminium items each have their own range. Start at the middle of that range, press with firm pressure, and adjust by small steps on a test piece before a full batch.
Do I need a Teflon sheet for sublimation pressing?
A Teflon or protective sheet helps keep ink from transferring to the platen and keeps the press clean. Place it over the transfer during pressing if your paper and blank maker allows it, and replace it when ink builds up or the surface marks.
Why is my sublimation transfer faded after pressing?
Faded colour often comes from low pressure, a blank with too little polyester, damp paper, or lifting the sheet before the ink has set. Check the blank content, dry the transfer, firm up the pressure, and follow the paper maker's lift timing.
Can a Cricut EasyPress Mini handle sublimation settings?
The Mini can reach pressing temperatures, but its small platen makes large blanks slow and uneven. It suits small items and touch-ups, while a larger press gives more even contact for shirts, tote bags and full-width designs.