How to Use Cricut EasyPress Mini
Use Cricut EasyPress Mini with a firm, heat-safe surface, the correct setting, and controlled circular movement. Keep the press moving over small transfers instead of holding it in one place.
On this page (10 sections)
- What do you need before using Cricut EasyPress Mini?
- How do you prepare a design for EasyPress Mini?
- How do you set the heat and time?
- How do you move Cricut EasyPress Mini?
- How do you press a small transfer?
- Can screen printing ink replace an iron-on transfer?
- What screen-printing tools can support a craft setup?
- How do you use Cricut EasyPress Mini safely?
- How do you care for the transfer after pressing?
- What is the best way to use Cricut EasyPress Mini?
Use Cricut EasyPress Mini for small iron-on transfers and awkward surfaces where a full-size press cannot sit flat. Choose the correct heat setting for the fabric and transfer, then move the press in controlled circles or short passes while keeping steady pressure.
The Mini works best for small logos, sleeve designs, pockets, shoe panels, hats, and narrow areas. Compare a top and bottom heat hat press for cap projects.
It is less practical for a large shirt graphic because its small heating area requires repeated passes.
Cricut's EasyPress Mini instructions should guide the exact setting and transfer method for your material. For a broader overview of press types, see our heat press machine buying guide.
What do you need before using Cricut EasyPress Mini?
Prepare the transfer, blank item, heat-safe pressing surface, and a way to protect your hands from hot materials. You should also know the recommended temperature and time for the transfer type before switching on the press.
A firm surface matters because the Mini needs stable support while you move it. Avoid soft beds, thick towels, or uneven padding that can reduce pressure over parts of the design.
Check the item for seams, buttons, zippers, and folds. If one sits beneath the transfer, move the design or support the area so the press can make even contact.
If you are choosing between sizes, our guide to the best portable heat press machine explains where a small press fits into a craft setup.
How do you prepare a design for EasyPress Mini?
Prepare the design so the transfer fits fully on the target area and can be pressed in small sections if needed. Smooth the fabric, remove lint, and place the design exactly where you want it before applying heat.
For a cut iron-on design, follow the material instructions for cutting, weeding, and positioning. Keep the transfer flat and check that small pieces have not shifted before pressing.
A small press is useful when the target area is narrow or curved. Before using a mug press for a tumbler, check Cricut Mug Press tumbler compatibility.
Use it for one section at a time when the design is larger than the press surface, but keep track of which areas have already received heat.
Can you use Cricut EasyPress Mini on awkward surfaces?
Yes, Cricut EasyPress Mini is designed for small areas and awkward surfaces where a larger press cannot make useful contact. For mug projects, see the Cricut Mug Press review.
Sleeves, pockets, shoe sides, and curved sections need careful positioning and short, controlled movements.
Place the item so the target area is as flat as possible. If the fabric bends around an edge, press the center first and work toward the edge without dragging the transfer.
For general small-press technique, read how to use a mini heat press. The same basic rule applies: keep the tool moving and do not let heat collect in one spot.
How do you set the heat and time?
Set the heat and time according to the transfer material and fabric instructions. For sublimation, consult Cricut heat press settings for material-specific guidance.
Do not choose a setting based only on the fabric name because different transfer materials can require different conditions.
Start with the lowest setting that the material instructions recommend. Confirm that the press has reached the selected temperature before touching the transfer.
The Mini's small contact area makes movement part of the process. Use slow circles or short overlapping passes so each part of the design receives similar heat.
Do not press directly over exposed adhesive unless the transfer instructions allow it. Use a protective sheet when required, and keep the press away from plastic trims, labels, and other heat-sensitive parts.
How do you move Cricut EasyPress Mini?
Move the Mini in small circles or short back-and-forth passes while using steady, moderate pressure. Keep the motion controlled so the transfer does not shift before it bonds.
Begin over the middle of the design and move toward the edges. Overlap each pass slightly, but avoid repeatedly heating one corner while leaving another area untouched.
For a seam or curved edge, work in smaller sections. Lift and reposition the item when needed instead of twisting the press sharply across the surface.
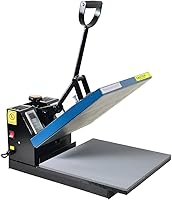
If you need a larger flat working area, the Fancierstudio Digital Heat Press 15 x offers a 15-by-15-inch heat press sheet, electronic time and heat control, adjustable pressure, and 1,800 watts of power.
That Fancierstudio model is an upward-opening press with a silicon-gel base board and a Teflon-coated heat platen. It has a 0-to-699°F temperature range and a 0-to-999-second time range, so it suits readers who want a fixed, larger pressing area.
It is not a substitute for the Mini on narrow or curved sections. Choose it when your projects are mostly flat and large enough to benefit from the 15-by-15-inch sheet.
How do you press a small transfer?
Press a small transfer by placing it on the prepared area, covering it as directed, and moving the Mini across the design for the required time. Keep the press flat against the transfer whenever the surface allows.
Use the edge of the press carefully around seams and raised details. Do not force the tool over a ridge if doing so lifts part of the transfer away from the fabric.
When the time is complete, follow the transfer material's instructions for peeling. Some materials need a hot peel, warm peel, or cold peel, so do not remove the carrier sheet by habit.
Allow the design to cool as instructed before stretching or washing the item. Follow the transfer maker's care directions for washing and drying.
Can screen printing ink replace an iron-on transfer?
No. Screen printing ink is a different decorating method that is applied through a screen or with a brush, while an iron-on transfer bonds a prepared design to the material with heat.
The Speedball Fabric Screen Printing Ink Starter Set includes 6 colors, with 4 fluid ounces each of black, white, red, yellow, blue, and green ink. The water-based ink is intended for cotton, canvas, polyester, blends, linen, rayon, other synthetic fibers, paper, and cardboard, but not nylon.
Speedball says the ink becomes permanent after heat setting and cleans up with soap and water. It gives you more control over custom color mixing, but it requires a screen-printing or brush workflow instead of the quick placement used with a Cricut transfer.
Choose it when you want to make prints directly on fabric. Choose EasyPress Mini when the design is already cut or prepared and the main task is applying it to a small area.
What screen-printing tools can support a craft setup?
A screen-printing kit helps when you want to create designs before applying them by another method or when screen printing is the main decoration process. It does not turn EasyPress Mini into a screen printer.
The Caydo 23 Pieces Screen Printing Starter Kit, 3 Wood Frames with Mesh includes 10-by-14-inch, 8-by-12-inch, and 6-by-10-inch wood frames, 2 squeegees, A4 transparency film, an ink knife, masking tape, 10 wood mixing sticks, a glove, and instructions.
The 9.4-inch squeegee covers the larger screen, while the 5.9-inch squeegee supports smaller patterns and one-handed use. This kit suits beginners who want several frame sizes, but it involves more preparation than applying a ready-made iron-on transfer.
Use the 6-by-10-inch frame for smaller artwork and the larger frames for broader designs. Keep the work area organized so ink, film, tape, and screens remain separate from your heat-press surface.
How do you use Cricut EasyPress Mini safely?
Use Cricut EasyPress Mini on a stable, heat-safe surface and keep the hot plate away from skin, cords, and flammable materials. Return it to its stand or safe resting position whenever you stop pressing.
Keep children and pets away from the work area. Do not touch the heated surface to check its temperature, and do not leave the press unattended while it is hot.
Watch for synthetic fabric, plastic coatings, and trims that may react differently to heat. If the material instructions do not give a safe setting, test a hidden area only when the material maker allows it.
How do you care for the transfer after pressing?
Let the transfer cool or rest according to its instructions before moving, stretching, or washing the item. Washing too soon can weaken a design that has not fully bonded.
Turn decorated clothing inside out if the transfer instructions recommend it. Use the stated water temperature, detergent, drying method, and wait time.
Keep the EasyPress Mini clean and free of adhesive residue. Unplug it after use, let it cool fully, and store it where the heated surface cannot touch other materials.
For larger Cricut projects, compare the steps in how to use Cricut heat press for shirts. If you own the larger model, how to use Cricut EasyPress 3 covers a different operating format.
What is the best way to use Cricut EasyPress Mini?
The best way to use Cricut EasyPress Mini is to match the heat setting to the transfer, support the item on a firm surface, and keep the press moving over small sections. It is most useful when a full-size press cannot reach the design area cleanly.
Choose the Mini for sleeves, pockets, shoes, hats, seams, and other awkward surfaces. Choose the Fancierstudio 15-by-15-inch press for larger flat work, the Speedball set for direct screen printing with mixed colors, and the Caydo kit when you need frames and squeegees for making prints.
For more options before choosing a model, review our Cricut heat press reviews, then match the press size to the projects you make most often.
Frequently asked questions
How do you use Cricut EasyPress Mini?
Place the material on a firm, heat-safe surface, cover the transfer if required, choose the correct heat setting, and move the EasyPress Mini continuously over the design. Use controlled circular or back-and-forth movement instead of leaving the small press still.
Can Cricut EasyPress Mini press large designs?
It is better suited to small transfers, seams, pockets, sleeves, shoes, hats, and other awkward areas than large designs. For a large shirt graphic, divide the design into sections or use a larger heat press that covers more of the transfer at once.
How long should you press with Cricut EasyPress Mini?
Use the time and temperature recommended for your transfer material, then keep the press moving across the design for the required time. The correct setting depends on the fabric, transfer type, and surface, so follow the material maker's instructions.
Do you need a pressing mat for Cricut EasyPress Mini?
Use a firm, heat-safe pressing surface that protects the table and supports even pressure. A soft or uneven surface can make it harder to apply heat consistently, especially around seams and curved items.