How to Use Cricut EasyPress 3
To use Cricut EasyPress 3, connect it to the Cricut Heat app, set the recommended temperature and time, and press the transfer on a protected surface. Use steady pressure, follow the material instructions, and let the project cool as directed.
On this page (9 sections)
- What do you need before using Cricut EasyPress 3?
- How do you connect Cricut EasyPress 3?
- How do you prepare the transfer and blank?
- How do you set the heat and time?
- How do you apply a transfer with Cricut EasyPress 3?
- When should you peel the transfer?
- How do you make a design for screen printing?
- What should you do after pressing?
- What is the easiest way to use Cricut EasyPress 3?
To use Cricut EasyPress 3, connect it to the Cricut Heat app, prepare a firm pressing area, set the recommended heat and time, and apply the transfer with steady pressure. Finish by following the correct peel and cooling instructions for your material.
The EasyPress 3 is made for controlled heat-transfer work, but the result depends on more than temperature. The transfer type, blank material, pressing mat, pressure, and cooling method all matter.
What do you need before using Cricut EasyPress 3?
Before using Cricut EasyPress 3, prepare the press, a compatible transfer, the blank item, a firm heat-safe surface, and a pressing mat. Remove wrinkles, lint, and anything that could sit between the transfer and the blank.
A pressing mat supports the project while protecting the work area. If you need help choosing one, compare a best Cricut EasyPress pressing mat for heat resistance, surface support, and project size.
Read the transfer and blank instructions before turning on the press. They should tell you the required temperature, pressing time, pressure, and whether the transfer should be peeled hot, warm, or cool.
Keep the EasyPress 3 on its safety base when it is not pressing. Make sure the cord does not cross the work area, and keep children and pets away from the hot platen.
How do you connect Cricut EasyPress 3?
Open the Cricut Heat app and connect EasyPress 3 before choosing your project settings. The app helps guide temperature and time for supported materials and transfers.
Turn on the press and follow the app's connection prompts. Select the transfer type and blank material that match your project, then review the suggested settings before starting.
Don't choose a setting only because it worked for another project. Cotton, polyester, blends, coated items, and specialty blanks can need different treatment.
Cricut's EasyPress 3 information can help you review the press and its connected setup before beginning.
How do you prepare the transfer and blank?
Place the blank flat on the pressing mat and position the transfer exactly where you want it before heating. Smooth the blank so seams, folds, buttons, and thick edges do not sit under the pressing area.
For a cut transfer, remove excess material around the design if the transfer method requires it. Keep the design carrier or protective sheet in the position recommended by the transfer instructions.
Measure the design against the blank before pressing. A quick layout check prevents a crooked image, an edge that sits too close to a seam, or a design that is too large for the pressing area.
If the item is fabric, pre-press only when the instructions allow it. A short pre-press can remove moisture and wrinkles, but the transfer instructions take priority.
How do you set the heat and time?
Set the temperature and time from the Cricut Heat app or the transfer manufacturer's instructions. Use the exact material choice that matches your blank instead of relying on a general setting.
The EasyPress 3 is designed for connected pressing, so check the app before each new material. Settings can change when you move from a shirt to a bag, from iron-on to sublimation, or from one blank type to another.
For sublimation, see Cricut heat press settings for material-specific guidance.
Wait until the press reaches the selected temperature. Keep the press on its base while it heats, and don't touch the platen.
The press should sit flat over the design when the project fits beneath it. If the design is larger than the pressing area, use controlled sections with the required overlap rather than sliding the hot press across the transfer.
How do you apply a transfer with Cricut EasyPress 3?
Place the heated press over the covered design, apply the recommended pressure, and hold it still for the full time. Keep your hands on the handle and avoid lifting the press early to check the transfer.
Use a timer so the full pressing cycle is consistent. If the design has several sections, keep the press level and follow the transfer instructions for overlap.
Do not drag the press across the blank. Sliding can move the transfer or create uneven contact, especially when the design has a carrier sheet.
For larger projects, press one section at a time. Make sure each section receives the correct heat and time, and protect finished areas if the instructions call for a cover sheet.
Which heat press can handle larger projects?
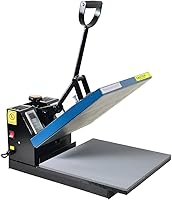
A larger work area can help when you regularly press broad designs or several parts of a garment. The Fancierstudio Digital Heat Press 15 x has a 15-by-15-inch heat press sheet, electronic time and heat control, adjustable pressure, and a Teflon-coated heat platen.
It uses 110 volts and 1800 watts, with a stated temperature range of 0–699°F and a time range of 0–999 seconds. Its upward-opening design can save space while you work, but you still need a firm, clear area for the machine.
Choose this type of press when a compact handheld workflow does not cover your usual project size. Choose EasyPress 3 when app-guided settings and a portable handheld format matter more.
For a broader comparison, see our heat press machine buying guide. If you need a smaller option for occasional work, review the best portable heat press machine.
When should you peel the transfer?
Peel the carrier sheet only when the transfer instructions say to do so. Some materials require a warm peel, while others need to cool before the carrier is removed.
Lift one corner carefully rather than pulling quickly. If the design lifts with the carrier, lay it back down and press again according to the instructions.
Never assume that more heat is always better. Excessive heat or time can damage a blank, distort a transfer, or affect the finish.
After peeling, place a protective sheet over the design if the transfer instructions recommend a final press. Let the project cool fully before folding or wearing it.
Can screen printing supplies support heat-transfer projects?
Screen printing supplies help with a different decoration method, but they can support readers who want to create printed designs rather than use a ready-made iron-on transfer. The Speedball Fabric Screen Printing Ink Starter Set includes 6 colors, with 4 fl oz of each black, white, red, yellow, blue, and green ink.
Speedball describes the ink as water based and suitable for cotton, canvas, polyester, blends, linen, rayon, other synthetic fibers, paper, and cardboard. It is not for nylon, and the ink needs to be heat set for permanence.
This set is not a substitute for Cricut EasyPress 3 transfer settings. Choose it when you want to build a screen-printing workflow, then follow its instructions for application and heat setting.
How do you make a design for screen printing?
Use a screen-printing frame, squeegee, and suitable ink when creating a printed design instead of pressing a cut transfer. A transparency film can help transfer a pattern during screen preparation.
The Caydo 23 Pieces Screen Printing Starter Kit includes 3 wood frames with mesh in 10 x 14 in, 8 x 12 in, and 6 x 10 in sizes. It also includes 2 squeegees, A4 inkjet transparency film, an ink knife, masking tape, 10 wood mixing sticks, a glove, and instructions.
The 9.4 in squeegee is suited to covering the larger screen, while the 5.9 in squeegee is sized for smaller patterns. The different frame sizes help you match the screen to a T-shirt, canvas tote bag, or tank top.
Screen printing and EasyPress work are separate methods. Use the Caydo kit for preparing and printing a design, and use EasyPress 3 only when the ink or transfer instructions support heat setting.
What should you do after pressing?
Turn off EasyPress 3, return it to the safety base, and let the project cool according to the transfer instructions. Unplug the press after it has been safely placed on its base if you are finished.
Keep the hot platen away from fabric, paper, plastic, and other items. Wait until the press is cool before storing it.
Care for the blank according to the transfer instructions. Washing, drying, folding, or wearing the item too soon can affect the finished design.
If you want another connected Cricut workflow, compare how to use Cricut EasyPress Mini and how to use Cricut EasyPress SE. For broader product comparisons, see the Cricut heat press reviews and best heat press bundle guides.
What is the easiest way to use Cricut EasyPress 3?
For how to use Cricut EasyPress 3, match the transfer and blank, connect the press to the Cricut Heat app, and follow the recommended heat, time, pressure, and peel instructions. Keep the press level and still during the cycle.
Choose EasyPress 3 for app-guided handheld pressing. Choose the Fancierstudio Digital Heat Press 15 x when a 15-by-15-inch pressing area suits your projects better, or choose screen-printing supplies when you want to create designs with ink and mesh frames.
Frequently asked questions
Do you need the Cricut Heat app for EasyPress 3?
Cricut EasyPress 3 uses the Cricut Heat app to guide setup, temperature, time, and material selection. Connect the press through the app before starting so you can follow the recommended settings for your transfer.
Keep the phone or tablet nearby while preparing the project.
What surface should you use with Cricut EasyPress 3?
Use a firm, heat-safe surface with a pressing mat designed for heat-transfer work. Avoid soft ironing boards, glass, countertops that can be damaged by heat, and surfaces that flex under pressure.
Keep the area clear of cords, fabric, and other items.
How long do you press with Cricut EasyPress 3?
The correct time depends on the transfer type, material, and project instructions. Use the Cricut Heat app or the transfer maker's directions instead of guessing.
Apply the recommended time in one controlled press when possible, then follow the stated peel and cooling instructions.
Can Cricut EasyPress 3 apply sublimation transfers?
Cricut EasyPress 3 can be used for heat-transfer projects when the transfer and blank instructions support the press. Sublimation requires compatible materials and specific temperature, time, and pressure settings.
Check the transfer instructions before pressing, and use a protective setup for the work surface.