How to Choose a Top and Bottom Heat Hat Press
Choose a top and bottom heat hat press when you want heat from both sides of a curved cap. Compare platen fit, pressure control, temperature range, timing and the transfer materials you plan to use.
On this page (11 sections)
- Why choose a hat press with top and bottom heat?
- How does a top and bottom heat hat press work?
- What should you compare in a double heat hat press?
- Which transfer materials work with a hat press?
- How do you prepare a cap for bottom heat?
- What mistakes can cause an uneven hat transfer?
- Which product can cover more than hat pressing?
- Can a screen-printing kit help with hat projects?
- How should you clean and care for a hat press?
- What is the best way to choose a top and bottom heat hat press?
- Frequently asked questions
A top and bottom heat hat press is useful when you want heat on both sides of a curved cap during a transfer. The best choice combines dual heated platens with a cap form that holds the hat steady, adjustable pressure, and clear time and temperature controls.
Bottom heat does not solve every transfer problem by itself. The cap must sit in the correct position, the design must fit the front panel, and the transfer material must be used within its recommended settings.
If you need a broader overview of press types, start with our heat press machine buying guide. It explains the main controls and use cases before you narrow the search to a hat press.
Why choose a hat press with top and bottom heat?
Choose a hat press with top and bottom heat when you want the upper transfer area and the supporting cap surface warmed together. This can be helpful on curved caps because the material is not being pressed against a completely cold lower surface.
A dual-heat design can also make the heating arrangement easier to understand. Instead of relying only on heat from the upper platen, you can compare how the lower platen supports the cap and whether the press keeps contact across the design area.
The main reasons to consider a bottom heat hat press are:
- You want heat on both sides of the cap area.
- You apply transfers to curved front panels.
- You want more control over the heating setup.
- You need repeatable time and temperature settings.
- You plan to make several caps with similar designs.
Dual heat is not automatically better for every user. It can add controls, wiring and setup decisions, so compare the machine's instructions and work space before paying more for the feature.
How does a top and bottom heat hat press work?
A top and bottom heat hat press uses an upper heated platen and a lower heated surface or form. The cap is placed between them, with the transfer positioned on the target area before the press closes.
The curved form matters because a cap front is not flat. A suitable form helps the upper platen meet the design more evenly, while the lower heated surface supports the area beneath the fabric.
A typical workflow is:
- Choose a clean, dry cap and check the front panel for seams, buttons or thick stitching.
- Place the cap on the curved lower form.
- Smooth the front panel so it follows the shape of the form.
- Position the transfer on the cap.
- Set the time and temperature required for that transfer material.
- Adjust pressure so the platens make firm contact without crushing the cap.
- Close the press for the required cycle.
- Open the press, remove the cap safely and follow the transfer's recommended cooling or peeling method.
Read our how to heat press a hat guide for the loading and transfer steps in more detail.
What should you compare in a double heat hat press?
Compare platen contact, controls and pressure adjustment first. These features affect whether the transfer receives even heat across the curved design area.
Are both platens actually heated?
Confirm that the upper and lower surfaces provide heat rather than assuming that a metal lower form is heated. A true dual heated platen arrangement should make clear how each side is controlled and how the heat reaches the cap.
Ask these questions before choosing:
- Does the lower surface heat independently?
- Can you set the upper and lower temperatures separately?
- Does the machine show one temperature or more than one?
- Is the lower heat intended for the cap, the transfer or both?
- Are the recommended settings clear for your materials?
If the instructions do not explain how bottom heat works, you may have difficulty choosing a repeatable setup. Look for controls that are easy to read and adjust.
Does the curved platen fit your caps?
A curved platen should support the cap's front panel without forcing the fabric into sharp folds. The right shape depends on the cap style, crown depth, bill shape and design location.
Measure the area where your transfer will sit. A large design may need a wider front panel, while a small logo may fit on several cap styles.
Look for a form that keeps the cap centered. A cap that shifts during closing can move the transfer or create uneven pressure at the edges.
Can you adjust pressure?
Adjustable pressure helps you match the press to different cap thicknesses and materials. Too little pressure may leave part of the design without firm contact, while too much can distort the cap or create unwanted marks.
Pressure should be firm and controlled rather than forced. Start with the setting recommended for your transfer material, then make small changes if the design area is not contacting evenly.
Are time and temperature easy to control?
Digital time and temperature controls help you repeat a process across several caps. Choose a press that lets you see the settings clearly and change them without guessing.
Temperature control matters because different transfer materials require different heat levels. Time control matters because a short cycle may leave the transfer incomplete, while excessive heat or time may affect the material or cap.
Keep a simple record of the cap type, transfer type, temperature, time and pressure. This makes it easier to repeat a result without relying on memory.
Does the press fit your workspace?
A hat press needs room for the machine, caps, transfers and safe handling. Measure the table or bench before ordering, and leave enough space to open the press without hitting a wall or shelf.
Also consider the electrical supply, ventilation and the path between storage and the press. A machine that fits on paper can still be awkward if you cannot place a cap on the form safely.
Which transfer materials work with a hat press?
A hat press can work with several transfer methods, but the correct setting depends on the material and the cap fabric. For DTF-specific steps, see how to heat press DTF transfers.
Always follow the transfer manufacturer's instructions for time, temperature, pressure and peeling.
Common options include:
- Heat transfer vinyl for lettering, numbers and simple shapes.
- Sublimation transfers for compatible light-colored polyester caps.
- Screen-printed transfers for prepared designs.
- Other specialty transfers that specify use on hats.
The cap fabric affects the choice. Cotton, polyester, blends and coated materials can respond differently to heat and pressure.
Check for coatings, seams and surface treatments before starting a production run.
A screen-printing ink set is not the same as a heat transfer. It may help you create fabric designs through a screen-printing process, but it does not automatically become suitable for pressing directly onto a cap.
This set includes 6 colors, with 4 fluid ounces of each color. The colors are black, white, red, yellow, blue and green, and they can be used as-is or mixed for custom colors.
The water-based ink is intended for cotton, canvas, polyester, blends, linen, rayon and other synthetic fabrics, plus paper and cardboard. It is not for nylon.
Use a compatible screen-printing workflow rather than placing wet ink into a hat press. The ink is designed to be heat-set after printing, so follow the material's process and keep the cap pressing stage separate from screen preparation.
How do you prepare a cap for bottom heat?
Prepare the cap by checking its shape and clearing the front panel of anything that can stop even contact. A seam, button, thick stitching or folded fabric can create a high spot under the transfer.
Before pressing, check:
- The front panel is smooth and centered.
- The bill is positioned safely away from the closing path.
- The transfer fits within the usable panel.
- The cap is supported by the curved form.
- The transfer is secured so it cannot move.
- The press is set to the correct time and temperature.
Do a small test when the material and cap allow it. A test can reveal problems with placement, pressure or heat before you use the final design.
If your cap press is automatic, compare its cycle and pressure behavior with your needs in our automatic hat heat press guide. Automatic operation may reduce repeated manual steps, but it does not remove the need to position each cap correctly.
What mistakes can cause an uneven hat transfer?
Uneven contact, poor placement and incorrect settings are the most common causes of weak or incomplete hat transfers. Bottom heat can help support the process, but it cannot correct a cap that is badly loaded.
Watch for these problems:
The transfer does not cover the full design
This often points to a curved surface that does not meet the platen evenly. Check that the cap sits fully on the form and that the pressure is not too light.
The edges do not adhere
Edges can fail when the design extends over a seam, the cap shifts, or the platen shape does not match the panel. Move the design to a smoother area or choose a form with better support.
The cap shows a shiny or pressed mark
A mark can result from excessive heat, pressure or contact with a finish that does not tolerate the setting. Reduce unnecessary pressure and follow the material instructions.
The design moves during pressing
Secure the transfer with the recommended tape or positioning method. Close the press smoothly instead of pushing the cap or transfer sideways.
The cap is difficult to remove
Wait for the recommended cooling or peeling stage, then open the press carefully. Do not pull the cap against a hot platen or force it off the form.
Which product can cover more than hat pressing?
A general heat press can make sense if you press hats occasionally and also work on flat items. If you want automated flat-item pressing, compare automatic 16x20 heat presses.
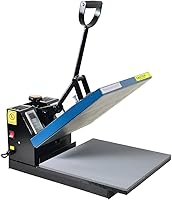
The Fancierstudio model here has a 15-by-15-inch heat press sheet, 110-volt power, 1800 watts, electronic time and heat control, adjustable pressure, a silicon-gel base board and a Teflon-coated heat platen.
Its temperature range is 0–699 degrees F and its time range is 0–999 seconds. The machine opens upward, which can help when you need to work in a limited area above the press, but it is not the same as a dedicated curved hat press with top and bottom heated platens.
Choose it when your work includes flat materials and hats are only an occasional project with a suitable attachment. If hats are your main focus, compare the curved form and bottom heat arrangement before choosing a general flat press.
For a larger flat pressing area, see our guide to a 16x20 heat press auto open. For basic operation and setup, read how to use a Fancierstudio heat press.
Can a screen-printing kit help with hat projects?
A screen-printing kit can help you prepare designs for fabric projects, but it is not a substitute for a top and bottom heat hat press. Choose one when you want to make screens, mix ink and print designs before using the appropriate curing or heat-setting process.
The kit includes 3 wood frames with 110 mesh in 10 x 14 in, 8 x 12 in and 6 x 10 in sizes. It also includes a 9.4 in squeegee, a 5.9 in squeegee, 2 plastic scrapers, an ink knife, masking tape, 5 A4 inkjet transparency films, 10 wood mixing sticks, 1 glove and instructions.
Those frame sizes can help you work with different design layouts, but they do not determine whether a design will fit a curved cap. Measure the cap panel and plan the design before making the screen.
How should you clean and care for a hat press?
Clean the press only after it is switched off and safe to handle. Remove transfer scraps and residue with a method approved for the platen coating and the machine's instructions.
Keep the curved form free of dust, ink and adhesive. Debris under the cap can create a raised spot that affects contact and may mark the fabric.
Good care includes:
- Letting heated surfaces cool before storage or cleaning.
- Keeping the power cord away from hot areas.
- Checking that the cap form remains secure.
- Removing transfer film scraps after each project.
- Storing caps and transfer materials away from moisture and dust.
- Avoiding force when opening or closing the press.
Do not use a cleaning product that can damage the platen coating or the cap form. If the manufacturer's instructions require a specific cleaning method, follow that method.
What is the best way to choose a top and bottom heat hat press?
Choose a top and bottom heat hat press with a matching curved form, adjustable pressure and clear dual-heat controls if you regularly apply transfers to caps. Prioritize the platen shape and contact area before choosing extra features.
Pick a dedicated dual-heat hat press if caps are your main project and you want heat from both sides. Pick a general flat heat press with an appropriate attachment if you also press shirts, bags, mouse pads or other flat items.
Before you decide, confirm the cap styles you use, the transfer materials you plan to apply, the required time and temperature range, the available work space and the way the lower heat is controlled. If you need a specific machine workflow, compare how to use htvront hat heat press before setting up your process.
A dual heated platen is useful when it matches your materials and workflow. It is not a replacement for correct cap placement, suitable pressure or careful transfer settings.
Frequently asked questions
What is a top and bottom heat hat press?
A top and bottom heat hat press applies heat from both sides of a cap or hat area. The dual-heated design can warm the transfer and the curved surface together, but you still need a platen shape, pressure setting and temperature that suit the cap and transfer material.
Is bottom heat useful on a hat press?
Bottom heat can help warm the part of the cap resting against the lower platen. It may support more even transfer conditions on a curved cap, but it does not replace correct loading, firm contact, suitable transfer material and the time and temperature instructions for that material.
What should I check before buying a double heat hat press?
Check whether both platens are heated, whether the cap sits securely on the curved form, how pressure is adjusted, and how temperature and time are controlled. Also measure your work area and confirm that the press suits the cap sizes and transfer types you plan to use.
Can I use a regular heat press for hats?
You can use a regular heat press only when it has a suitable hat attachment or curved platen. A flat platen may not contact a curved cap evenly, which can cause weak edges or incomplete transfers.
Compare the best hat press attachment for heat press options before adapting a flat machine.
Frequently asked questions
What is a top and bottom heat hat press?
A top and bottom heat hat press applies heat from both sides of a cap or hat area. The dual-heated design can warm the transfer and the curved surface together, but you still need a platen shape, pressure setting and temperature that suit the cap and transfer material.
Is bottom heat useful on a hat press?
Bottom heat can help warm the part of the cap resting against the lower platen. It may support more even transfer conditions on a curved cap, but it does not replace correct loading, firm contact, suitable transfer material and the time and temperature instructions for that material.
What should I check before buying a double heat hat press?
Check whether both platens are heated, whether the cap sits securely on the curved form, how pressure is adjusted, and how temperature and time are controlled. Also measure your work area and confirm that the press suits the cap sizes and transfer types you plan to use.
Can I use a regular heat press for hats?
You can use a regular heat press only when it has a suitable hat attachment or curved platen. A flat platen may not contact a curved cap evenly, which can cause weak edges or incomplete transfers.
Compare the best hat press attachment for heat press options before adapting a flat machine.