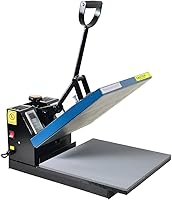
How to Use a Fancierstudio Heat Press
To use a Fancierstudio heat press, set the temperature and time, adjust pressure, place the transfer and garment on the base, then press and peel according to the transfer instructions. Start with a test piece when possible.
On this page (8 sections)
- What should you prepare before using a Fancierstudio heat press?
- How do you set the temperature and time?
- How do you place a shirt and transfer?
- What is the correct pressing sequence?
- How can you prepare a screen-printing design?
- How do you choose pressure on a Fancierstudio press?
- How do you care for the platen and base?
- What should you check before buying or replacing one?
To use a Fancierstudio heat press, set the correct heat and time, adjust pressure, position the transfer on the garment, and press it according to the transfer instructions. The 15-by-15-inch model has electronic time and heat controls, adjustable pressure, a silicon-gel base board, and a Teflon-coated heat platen.
This setup suits home crafters and small shops that press shirts, bags, mouse pads, and other flat items. The 15-by-15-inch area gives room for a full chest design on many garments.
Measure the design and the garment first so edges stay inside the platen.
Start by reading the instructions for your transfer material. Heat-transfer vinyl, sublimation transfers, and screen-printing ink can need different temperatures, times, pressure, and peeling methods.
Electronic control means you can set a time range of 0 to 999 seconds and a temperature range of 0 to 699 degrees F, with a listed upper temperature rating of 500 degrees F. Use those ranges to match the material, not to guess.
A lower setting may leave a design underpressed, while a higher setting may harm the fabric or the design.
Adjustable pressure helps you get even contact on thicker items. Test on a spare piece when you can, especially with a new material or a layered design.
The included heat press sheet and Teflon coating help protect the platen during normal use, but you should still follow the transfer maker notes for cover sheets and peeling.
What should you prepare before using a Fancierstudio heat press?
Prepare the press, garment, transfer, a flat work area, and any protective sheet required by the transfer instructions. A 15-by-15-inch pressing area suits many shirts and other flat items, but measure oversized designs before you begin.
The Fancierstudio press uses 110 volts and 1800 watts. Its listed dimensions are 33 in L by 23 in W by 20 in H, so leave enough room for the upward-opening platen and for handling the garment.
If you are comparing different machines first, our heat press machine buying guide explains the main size, pressure, and control choices. Readers working in a smaller home setup can also compare best heat presses for home use.
Which Fancierstudio model suits this process?
The Fancierstudio Digital Heat Press 15 x 15 Sublimation Rhinestone Heat T-Shirt Machine15x15 B/BLK is suited to readers who want a 15-by-15-inch press with electronic controls for transfers, letters, numbers, and images.
Its temperature control range is 0 to 699°F, and its time range is 0 to 999 seconds. The listed upper temperature rating is 500°F, so follow the heat-transfer material's instructions and stay within the press's operating guidance.
How do you set the temperature and time?
Set heat and time from the transfer manufacturer's instructions, then let the press reach temperature before pressing. The electronic controls help you enter the settings, while the adjustable pressure control lets you prepare the platen for the material's thickness.
Do not choose a setting only because it worked for another fabric or transfer. Record the temperature, time, pressure feel, and peeling method for successful projects so you can repeat them.
Place the press on a stable surface with the power cord away from the hot platen. Keep children, loose fabric, and unrelated objects away from the pressing area.
Allow the machine to cool fully before moving or storing it.
How do you place a shirt and transfer?
Lay the shirt flat on the silicon-gel base board and smooth out wrinkles before positioning the transfer. Center the design by measuring from the collar, side seams, or shirt edges rather than judging from a folded garment.
Place the transfer with its correct side facing the garment. Check the transfer instructions to see whether it needs a cover sheet, whether the carrier should be peeled hot or cold, and whether a second press is needed.
Keep seams, zippers, buttons, pockets, and thick folds outside the main pressing area. Uneven layers can affect how the transfer receives heat and pressure.
For help choosing a printer before making transfer sheets, read what printer is compatible with heat transfer vinyl. A printer choice and a heat press choice solve different parts of the transfer process.
What is the correct pressing sequence?
Close the press only after the garment and transfer are positioned, then press for the full instructed time. Keep your hands clear of the platen as it closes and opens.
When the timer ends, open the upward-opening press and follow the transfer's peeling directions. Do not pull at the carrier early if the instructions call for a cold peel.
Inspect the design after peeling. If an edge has not bonded, follow the transfer instructions before applying another press.
Avoid repeatedly pressing without knowing whether extra heat could damage the fabric or design.
Can screen-printing supplies work with this setup?
Screen-printing supplies can help create designs before heat setting, but they are separate from the heat press itself. The Speedball set includes 6 colors in 4-fl oz jars: black, white, red, yellow, blue, and green.
Speedball describes these as water-based fabric screen-printing inks for cotton, canvas, polyester, blends, linen, rayon, other synthetics, paper, and cardboard. The description excludes nylon, so check the fabric before using the ink.
The inks are water soluble and clean up with soap and water. Follow Speedball's heat-setting directions rather than treating a heat press cycle for vinyl as automatically correct for screen-printing ink.
How can you prepare a screen-printing design?
Use a frame, squeegee, stencil or transparency process, and suitable ink before using the press for heat setting. The heat press does not create the screen print; it can help with the later setting step when the ink instructions allow it.
The Caydo 23 Pieces Screen Printing Starter Kit includes 3 wood frames with mesh in 10 by 14 in, 8 by 12 in, and 6 by 10 in sizes. It also includes 2 squeegees, A4 inkjet transparency film, an ink knife, masking tape, 10 wood mixing sticks, a glove, plastic scrapers, and instructions.
The different frame sizes help you match the screen to the design area. The 9.4-in squeegee covers the larger frame more easily, while the 5.9-in option suits smaller patterns and one-handed use.
Use the frame and ink process first, then apply heat only as directed for the ink and fabric. Caydo's kit is intended for patterns on T-shirts, canvas tote bags, and tank tops.
How do you choose pressure on a Fancierstudio press?
Use enough pressure for even contact without forcing the handle or crushing thick materials. The Fancierstudio model has adjustable pressure, so the correct setting depends on the garment, transfer, and any layered material.
Start with the transfer instructions and make small adjustments when a test piece shows uneven contact. A design that reaches the edge of the platen may need repositioning rather than extra pressure.
The press is described for items such as T-shirts, garments, bags, mouse pads, jigsaw puzzles, ID badges, ceramic tiles, and other items. Check the item's shape and heat tolerance before pressing it.
If your budget is limited, compare best heat presses under 150 dollars and best heat presses under 200 dollars before choosing a machine.
How do you care for the platen and base?
Keep the platen and silicon-gel base clean, dry, and free of transfer residue. Allow the press to cool before cleaning and follow the machine's care instructions for the Teflon coating.
Remove loose scraps before the next project so they do not transfer onto another garment. Do not place wet garments or wet ink against a hot platen unless the material instructions specifically require that process.
Store transfers, screens, inks, and garments away from the heated press. Keep ink containers closed and clean screen-printing tools with the method recommended for the ink.
For hat projects, a flat 15-by-15-inch press is not the same tool as a dedicated hat press. See how to use an HTVRONT hat heat press if your project uses curved caps.
What should you check before buying or replacing one?
Choose a Fancierstudio heat press if you need a 15-by-15-inch flat pressing area, electronic controls, adjustable pressure, and 110-volt operation. Measure your work area first because the full machine dimensions are 33 in L by 23 in W by 20 in H.
Look at a different size if your designs regularly exceed 15 by 15 in. Our guide to best 15x15 heat presses can help you compare this working size with other options.
Use the Fancierstudio press for the transfer method you understand and can set correctly. Pick the Speedball ink set when you need several water-based screen-printing colors, and pick the Caydo kit when you need frames, squeegees, transparency film, and basic screen-printing tools.
The key to learning how to use a Fancierstudio heat press is matching heat, time, pressure, fabric, and peeling method to the transfer instructions. Test the process on a spare piece when possible, then repeat the settings that produce an even result.
Frequently asked questions
How do you set a Fancierstudio heat press?
Turn on the press, set the target temperature and pressing time with the electronic controls, and allow the platen to reach temperature before starting. Set pressure separately with the adjustable pressure control, using the transfer maker's instructions for the material and design.
What temperature should you use on a Fancierstudio heat press?
Use the temperature recommended for your specific transfer, vinyl, or ink. The Fancierstudio model has an electronic temperature range from 0 to 699°F and a listed upper temperature rating of 500°F, so the transfer instructions should control your setting rather than a general preset.
How do you place a shirt in a Fancierstudio heat press?
Lay the shirt flat on the silicon-gel base board, smooth the fabric, and position the transfer where you want it before closing the upward-opening press. Keep seams, zippers, buttons, and thick folds away from the pressing area so the material sits evenly.
Can you use a Fancierstudio heat press for screen printing ink?
You can use a heat press as part of a screen-printing workflow when the ink instructions call for heat setting, but the press does not replace the screen, squeegee, or ink process. Follow the ink manufacturer's curing directions for the fabric and design.