How to Heat Press a Hat
To heat press a hat, center the design on the front panel, press it on a curved form with firm, even pressure, and peel according to the transfer type. Check your transfer's time and temperature, work in short presses, and test on a practice hat first.
On this page (9 sections)
- How to heat press hat designs step by step
- What equipment do you need to heat press a hat?
- How to use heat transfer vinyl on a hat
- How to press DTF and sublimation designs on hats
- Can you screen print a design on a hat?
- How do you keep pressure even on a curved surface?
- What temperature and time should you use?
- How can you fix a design that lifts or cracks?
- How do you care for a finished hat?
To heat press a hat, center the design on the front panel, press it on a curved form with firm, even pressure, and peel according to the transfer type. Check your transfer's time and temperature, work in short presses, and test on a practice hat first.
Hats ask for a different touch than flat shirts. The front panel curves, the fabric stretches, and seams sit close to the design area.
Good results come from support, careful placement, and matching settings to the transfer you use.
How to heat press hat designs step by step
The basic order is prepare the hat, position the design, press, peel, and finish. Follow the transfer maker for time, temperature, and peel directions.
Start with a clean, dry hat. Slide it onto a hat form or press pillow so the front panel sits smooth.
Center the design using the front seam or label as a guide.
Press for the time listed on the transfer instructions. Peel while warm or after cooling, as directed.
Let the hat cool on the form before you remove it.
How to position a design on a curved hat panel
Position the design high enough to clear the seam, low enough to sit on the flat part of the panel, and centered left to right. Put the hat on the form first, then place the design.
Mark the center with a small removable mark if there is no visible seam. Check the top, bottom, and sides before you press.
Designs that look centered on a flat table can shift on a curve.
Keep small designs below the top edge of the panel. Trim away extra carrier sheet, since extra film can catch on seams during the press.
What equipment do you need to heat press a hat?
You need a heat press, a hat form or pillow, your design material, and a way to hold the design in place. A dedicated hat press makes the job easier, but a standard press can work with the right support.
A heat press machine gives control over time, temperature, and pressure. That control matters on hats, where a brief press at the right setting often beats a long press at a guess.
For curved surfaces, a hat attachment or pillow shapes the panel so the platen can reach the full design. The best hat press attachment for heat press guide compares forms that fit different press models.
An automatic hat heat press can open and close the form for you.
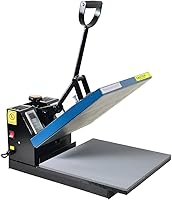
The Fancierstudio press has a 15 by 15 inch platen, a 0 to 699 degree F range, and a 0 to 999 second time range. It runs at 110 volts and 1800 watts, with electronic time and heat control.
Its upper temperature rating is 500 degrees F, so check that limit against your transfer before you buy.
How to use heat transfer vinyl on a hat
Heat transfer vinyl works best when you cut the design correctly, weed the extra vinyl, and press at the maker time and temperature. Weed the design fully before you place it, since small bits can shift under heat.
Check What Printer Is Compatible with Heat Transfer Vinyl? if you plan to print your own vinyl designs. Most craft vinyl is cut with a cutting machine, not printed at home.
Place the vinyl with the carrier side up, unless your vinyl calls for a different order. Press on the form with firm pressure, then peel as directed.
Some vinyl peels warm and some peels cold. If you layer colors, keep times short, since thick stacks can lift on a curve.
How to press DTF and sublimation designs on hats
DTF and sublimation each need their own film, ink, and press settings, and neither is a direct swap for vinyl. Match the transfer type to the hat fabric before you press.
For DTF, use the best hat heat press for dtf advice on time, temperature, and peeling. DTF transfers often need a powder cure and a firm press, then a peel that may be warm or cold.
Sublimation suits light colored polyester fabric. It will not show well on dark cotton hats.
A top and bottom heat hat press can help when the back of the panel needs heat too.
Can you screen print a design on a hat?
Yes, you can screen print a hat, but you need a screen, a squeegee, and ink made for fabric, plus a way to hold the hat steady. Screen printing puts ink through mesh onto the fabric, then the ink cures with heat.
The Speedball Fabric Screen Printing Ink Starter Set, 6-Colors, 4 Fl Oz for T-Shirt and Silkscreen Printmaking rel="sponsored nofollow" gives you 6 colors in 4 fluid ounce jars: black, white, red, yellow, blue, and green.
Speedball says the water based ink is permanent after heat setting and cleans up with soap and water. It suits cotton, canvas, polyester, blends, linen, rayon, and other synthetics, plus paper and cardboard, but not nylon.
The inks carry the AP Seal from the Arts and Creative Materials Institute.
Screen printing on a hat takes practice because the panel curves and mesh must stay in contact. A form helps, and a small design is easier than a wide one.
Who should choose the Caydo screen printing kit?
Choose the Caydo kit if you want frames, squeegees, and mixing tools in one starter set for small print projects. It suits beginners who want to try screen printing on shirts, tote bags, and hats.
The kit includes 3 wood frames with 110 mesh in 10 x 14, 8 x 12, and 6 x 10 inches, plus 5 A4 inkjet transparency films. It also includes 2 squeegees at 9.4 and 5.9 inches, an ink knife, masking tape, 10 wood mixing sticks, and a glove.
The smallest frame, at 6 x 10 inches, fits hat designs better than the larger frames. The 5.9 inch squeegee suits smaller patterns and one handed use.
You still need fabric ink, such as the Speedball set above.
How do you keep pressure even on a curved surface?
Even pressure comes from a form that supports the panel, a platen that covers the design, and a press you lock down for the full dwell time. Gaps under the panel are the main cause of lifted edges.
Use the best heat press pillows for hats to fill the inside of the hat and push the panel out toward the platen. A pillow should fill the space without stretching the fabric.
Press with the hat on the form and the design facing up. Hold pressure for the full time, then lift and check the edges.
If one side lifts, the form may be off center. Avoid pressing over a raised seam if you can move the design.
What temperature and time should you use?
Use the transfer maker time and temperature for your exact material, then adjust in small steps after a test press. There is no single setting for every hat design.
Vinyl, DTF, sublimation, and screen print ink all cure in different ways. The package for your transfer lists the range, and your hat fabric may narrow it further.
Thin fabric burns faster, and foam backed panels trap moisture.
Start at the low end of the range and press a test hat. Check the edges, the feel of the design, and any change in fabric color.
Raise time by a few seconds if the design lifts. Our best hat heat press guide compares machines with digital displays that help you repeat a working setup.
How can you fix a design that lifts or cracks?
A lifted edge usually means too little pressure, too little time, or a form that did not support the curve. Check those three first before you change the temperature.
Press the lifted area again with the hat back on the form. Use the same time and temperature as the first press.
If the design still lifts, add a few seconds and press again.
Cracking often points to too much heat, too much pressure, or a transfer that does not suit the fabric. Lower the temperature a little and test on a practice hat.
If a design peels off in sheets, the transfer may not match the hat fabric.
How do you learn the press controls for hats?
Learn the controls by pressing one practice design, noting the settings, and changing only one variable at a time. That habit turns guesswork into a repeatable process.
Our guide to how to use htvront hat heat press walks through setup steps for a hat specific machine. Keep a short log with hat type, transfer type, time, temperature, and result.
How do you care for a finished hat?
Care starts with letting the design cool on the form, then washing the hat gently after the bond sets. Follow the transfer maker wait time before the first wash.
Turn the hat inside out before washing, and use a gentle cycle with mild detergent. Avoid bleach and fabric softeners, which can weaken the bond.
Air dry when possible, since high dryer heat can curl edges.
Store hats away from direct heat and pressure. Stacking heavy items on a finished design can crease it.
If you choose a machine for future hats, our best hat heat press for patches guide compares options for thicker materials.
Frequently asked questions
How long should you press a design on a hat?
Use the time on the transfer instructions, since heat transfer vinyl, DTF, and sublimation each set a different dwell time. Start with the maker-recommended time, then check adhesion at the edges.
If edges lift, add a few seconds rather than raising the temperature first.
What temperature should you use for a hat?
Follow the transfer maker's temperature range for the exact material, because vinyl, DTF films, and sublimation transfers differ. Heat the hat form to that setting and confirm it with the press display before you press.
A test press helps you see whether the result bonds fully.
Why does a design lift on a curved hat?
A curve creates gaps where the platen does not touch the fabric evenly, so pressure drops at the edges. A hat form or pillow supports the panel and helps the press reach the full design area.
Short, firm presses and a second press after peeling can help the edges stay down.
Can you use a flat heat press for hats?
Yes, many people press hats with a flat platen by placing the hat over a form, pillow, or rounded support inside the front panel. The support keeps the design area from collapsing under pressure.
If your press is large, a smaller hat attachment gives you more control.