How to Heat Press DTF Transfers
To heat press DTF transfers, place the prepared film on the garment, press with the transfer maker's settings, peel as directed, and press again if required.
On this page (9 sections)
- How to Heat Press DTF Transfers
- What do you need before you heat press DTF?
- How do you prepare the garment and transfer?
- What are the basic steps for pressing DTF transfers?
- When should you peel the DTF film?
- Should you repress a DTF transfer?
- What can screen printing teach you about DTF pressing?
- How do you care for a garment after pressing?
- What is the simplest way to heat press DTF transfers?
How to Heat Press DTF Transfers
To heat press DTF transfers, place the prepared film on a clean garment, apply the correct heat and pressure, peel the film using the required method, and repress only when the transfer instructions call for it. The exact settings depend on the film, garment, press, and transfer supplier.
DTF means direct-to-film. The design arrives on transfer film and is applied to fabric with a heat press, so your main job is accurate placement, even pressure, and careful peeling.
If you are still choosing equipment, start with this guide to heat press machines. For a broader comparison of decoration methods, read heat press vs screen printing.
What do you need before you heat press DTF?
You need a heat press, a prepared DTF transfer, a suitable garment, a flat pressing surface, and the transfer maker's instructions. For a handheld press option, see how to use Cricut EasyPress SE.
A clean, lint-free garment and a stable work area make placement easier.
Check that the garment can handle the required heat. Cotton, polyester, and blends can respond differently, and some fabrics may need special protection or lower heat.
Prepare the design before turning on the press. Trim excess film if needed, confirm the print is facing the right way, and decide where the design should sit.
A 15-by-15-inch press gives you room for many shirt-sized designs. Compare heat presses for T-shirts to find a model suited to garment projects.
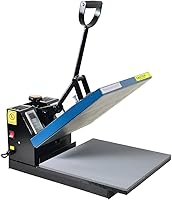
The Fancierstudio Digital Heat Press 15 x has a 15-by-15-inch pressing sheet, electronic time and heat control, adjustable pressure, a silicon-gel base board, and a Teflon-coated heat platen.
Its 110-volt, 1800-watt design suits a workspace with compatible power. The heat range is 0–699°F and the time range is 0–999 seconds, so set the machine to the transfer instructions rather than choosing a setting by guesswork.
How do you prepare the garment and transfer?
Lay the garment flat, remove wrinkles, and place the transfer film with the printed side facing the fabric. Keep seams, pockets, zippers, and thick folds away from the pressing area.
Prepress the garment briefly only if the transfer instructions allow it. This can help flatten the fabric and remove moisture, but the correct time and temperature come from the garment and transfer directions.
Use a ruler or visual centerline to position the design. Check the placement from several angles before closing the press.
If you are making your own transfer, see how to make DTF transfers with an inkjet printer. DTF film preparation and heat pressing are separate steps, so do not treat an ordinary printed sheet as a ready-to-press transfer.
What are the basic steps for pressing DTF transfers?
The basic order is preheat, place, press, peel, inspect, and repress when directed. Keep the film still while closing the press so the design does not shift.
- Turn on the press and set the required temperature and time.
- Place the garment flat on the lower platen.
- Position the DTF transfer with the design against the garment.
- Cover the transfer only if the instructions require a cover sheet.
- Close the press and apply the required pressure.
- Open the press when the timer ends.
- Peel the film using the specified hot, warm, or cold method.
- Check the design edges and repress only if instructed.
Do not add extra heat simply because the transfer looks dull before peeling. More heat can damage some garments, films, or designs.
For a general garment workflow, see how to heat press a T-shirt. DTF transfers still need their own film and peel instructions.
How much pressure should a DTF transfer get?
Use firm, even pressure without forcing the press beyond its normal adjustment. The transfer should contact the garment across the design, including its edges.
Too little pressure can leave parts of the design unattached. Too much pressure can flatten fabric texture or create unwanted marks, especially around seams and raised areas.
A press with adjustable pressure helps you match the garment and transfer. Test the setup on a spare area or similar garment when possible.
When should you peel the DTF film?
Peel only at the temperature specified for that transfer. Some films are designed for hot peeling, some for warm peeling, and others need to cool before removal.
Peel slowly from one corner while watching the design. If part of the print lifts with the film, lay the film back down and press again according to the instructions.
Do not pull the film sharply or lift it straight upward. A low, steady peel gives you more control over the design edges.
After peeling, inspect thin lines, corners, and small lettering. These areas show problems first because incomplete contact is easier to see there.
Should you repress a DTF transfer?
Repress only when the transfer instructions recommend it or when inspection shows an adhesion problem that the instructions address. A second press can help finish the application, but extra heat is not automatically better.
Use the required protective sheet or film layer if the instructions call for one. A cover can help protect the design and press surface, but the correct material depends on the transfer system.
The Fancierstudio press has a Teflon coating on its heat platen. Even with that coating, keep the platen and pressing area clean so loose ink, film, or fibers do not transfer to the next garment.
For information about protective sheets, read are Teflon sheets for heat press reusable.
What can screen printing teach you about DTF pressing?
Screen printing and DTF pressing use different transfer methods, but both depend on clean placement, even coverage, and proper heat setting. Screen printing applies ink through a mesh screen, while DTF applies a prepared film transfer.
The Speedball Fabric Screen Printing Ink Starter Set includes 6 colors in 4 fl oz quantities: black, white, red, yellow, blue, and green. The water-based ink is intended for screen printing or brush application and can be used on cotton, canvas, polyester, blends, linen, rayon, other synthetic fibers, paper, and cardboard.
This set is not a DTF transfer, so it does not replace prepared DTF film. It helps when you want to compare a screen-printing workflow with a heat-applied transfer workflow.
The Caydo 23 Pieces Screen Printing Starter Kit, 3 Wood Frames with Mesh includes 10-by-14-inch, 8-by-12-inch, and 6-by-10-inch wood frames with 110 mesh, 2 squeegees, A4 inkjet transparency film, an ink knife, masking tape, 10 wood mixing sticks, 1 glove, and instructions.
Its frames, squeegees, and transparency film support screen-printing projects on items such as T-shirts, canvas tote bags, and tank tops. The kit is useful for readers who want a separate screen-printing method, not for pressing a finished DTF transfer.
How do you care for a garment after pressing?
Let the transfer cool and follow its care instructions before washing. Turn the garment inside out, choose a gentle wash routine, and avoid direct ironing over the design.
Do not stretch the print while it is still warm. Store finished garments flat or on suitable hangers so the design does not fold against itself.
If the design cracks, lifts, or peels, review the original temperature, pressure, pressing time, and peel method. Check whether the garment surface was clean and whether seams or folds prevented full contact.
For sports clothing, use how to heat press on a jersey. If you are considering vinyl instead, read what printer is compatible with heat transfer vinyl.
What is the simplest way to heat press DTF transfers?
Use the transfer maker's settings, keep the garment flat, press evenly, and peel at the required temperature. Most avoidable problems come from guessing the settings, shifting the film, or peeling at the wrong time.
Choose the Fancierstudio press if you need a 15-by-15-inch pressing area with adjustable pressure and electronic controls. Choose the Speedball set or Caydo kit only if you are comparing DTF with screen printing and want supplies for that separate process.
For more equipment guidance, compare the best heat presses for DTF transfers. The right setup is the one that matches your transfer instructions, garment fabric, design size, and available workspace.
Frequently asked questions
What temperature should you use to heat press DTF transfers?
Use the temperature and time recommended for your specific DTF transfer film, powder, garment fabric, and equipment. DTF settings vary by transfer maker and material.
Start with a small test area when possible, then check adhesion after cooling and peeling.
Do you peel a DTF transfer hot or cold?
Peel a DTF transfer according to its instructions, because films can require hot, warm, or cold peeling. If the film lifts the design, stop peeling, lay it back down, and press again using the transfer maker's guidance.
Can you heat press DTF transfers onto cotton?
Yes, DTF transfers are commonly applied to cotton garments, but the transfer maker's instructions still control the temperature, pressure, time, and peel method. Check the garment care label and test the fabric before applying a design to a finished item.
How do you wash a shirt with a DTF transfer?
Follow the transfer maker's care instructions, but a cautious routine is to wait before washing, turn the garment inside out, use a gentle cycle, and avoid harsh heat. Do not iron directly over the printed design.