How to Heat Press on a Jersey
To heat press on a jersey, prepress the fabric, check the material label, and press the transfer at the transfer maker's time and temperature. Use light to medium pressure, peel as directed, then add a short second press to lock the bond.
On this page (12 sections)
- What fabric is your jersey made from, and why does it matter?
- How to heat press on a jersey step by step
- What temperature and time should you use for a jersey?
- How much pressure should you use on a jersey?
- Can you heat press vinyl on a mesh jersey?
- How do you place a name, number, and logo on a jersey?
- What printer or transfer should you use for a jersey?
- Which heat press should you use for jerseys?
- Can screen printing work on a jersey instead of heat press?
- What mistakes should you avoid when you press a jersey?
- How do you care for a jersey after heat pressing?
- How to heat press on a jersey: final checklist
To heat press on a jersey, prepress the fabric, check the material label, and press the transfer at the transfer maker's time and temperature.
Most jerseys are polyester, mesh, microfiber, or a blend. Those fabrics can shine or scorch at cotton settings, so follow the lower limit on the label and transfer sheet.
What fabric is your jersey made from, and why does it matter?
Read the fiber label before you set a temperature. Polyester and mesh need lower heat than cotton, and blends can mark at cotton settings.
Cotton tolerates heat well, but many team jerseys are not cotton. Shiny polyester can show a press box, and mesh holes can make a transfer look uneven.
Look for polyester, nylon, spandex, and microfiber. Those signal a lower setting and shorter press.
If the label is missing, test on a hidden area or similar scrap. The transfer sheet wins over general advice.
How to heat press on a jersey step by step
Prepress, position, press, peel, and finish with a short second press.
Lay the jersey flat and smooth wrinkles by hand. Prepress for 3 to 5 seconds to remove moisture and reveal seams or folds that can fight the design.
Place the transfer and tape the corners if the jersey shifts. For a back name, align the top edge first, then check the center line against the collar.
Press at the maker time and temperature with light to medium pressure. Peel in the stated direction, inspect the edges while warm, and finish with a short second press through a Teflon sheet if directed.
Our guide to how to heat press a tshirt covers the same sequence, with fabric sensitivity as the extra jersey check.
What temperature and time should you use for a jersey?
Use the transfer maker's temperature and time, then test on a scrap or hidden area. A heat press temperature chart can help organize common settings.
No single setting suits every jersey because fabric and transfer both set limits.
Many heat transfer vinyl makers start near 300 to 320°F for 10 to 15 seconds. That is only a starting point.
DTF, sublimation, and screen printed designs use different settings.
Polyester often needs the low end of the range. Mesh needs care because heat passes through holes in spots.
If you see shine or yellowing, lower the heat or shorten the time. See how to heat press dtf before choosing DTF for a jersey.
How much pressure should you use on a jersey?
Use light to medium pressure, enough to bond without crushing mesh or leaving a mark. Too much pressure can push the design into mesh holes and create shine.
A heat press gives fixed pressure, which is one reason a heat press machine works better than an iron. You can repeat the same pressure for each jersey, while an iron gives uneven results.
Start with medium pressure and check the bond after peeling. If edges lift, add a short press with slightly more pressure.
If you see a box mark, lower pressure or add a Teflon sheet. Keep designs away from shoulder seams when you can.
Can you heat press vinyl on a mesh jersey?
Yes, if the vinyl is made for low temperature and you test first.
Mesh is the hardest jersey fabric because the transfer must bridge holes without sinking. Choose vinyl stated for polyester or stretch fabric, since standard cotton vinyl can be too stiff and crack when the fabric moves.
Stretch vinyl stays flexible during play and washing.
Place a Teflon sheet under the jersey and another over the transfer. The under sheet stops adhesive passing through mesh holes, and the top sheet spreads heat and protects the surface.
Press in short bursts and check after it cools, since mesh can hide a weak bond while warm. Our guide to how to heat press vinyl on a shirt explains weeding and peeling, which matters for long names.
How do you place a name, number, and logo on a jersey?
Measure from the collar and center line, then tape the design in place before you press. Good placement keeps the design level and hides minor flaws.
For a back name, measure down from the collar seam and mark the top edge with heat tape. Center it by measuring from each shoulder seam.
Place numbers below with equal space on each side.
For a chest logo, follow the team style or league rule and keep it away from zippers, snaps, and patches. Use a ruler and low tack heat tape, not a pen.
See best heat press for patches if you use a patch, since patches often need more pressure.
What printer or transfer should you use for a jersey?
Match the transfer type to the fabric, not to the design alone.
Vinyl suits names, numbers, and simple solid logos. You cut and weed the design, then press it in one layer or stacked layers, which add thickness and can trap air.
DTF suits full color on many fabrics, including dark jerseys, when you cure the powder fully and follow DTF settings. Sublimation bonds dye to mostly polyester and suits light jerseys, but it will not show well on dark fabric.
See What Printer Is Compatible with Heat Transfer Vinyl? if you print your own transfers.
Which heat press should you use for jerseys?
Choose a press with a 15 by 15 inch platen, digital controls, and adjustable pressure. Compare heat presses for T-shirts for options suited to garment designs.
That size handles most jersey designs, and digital controls help you repeat the same settings for a full set of uniforms.
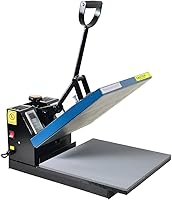
The Fancierstudio Digital Heat Press 15 x 15 has a 15 by 15 inch platen, 1800 watts of power, and a temperature range of 0 to 699 degrees F. It has electronic time and heat control, a silicon gel base board, and a Teflon coating on the heat platen.
Adjustable pressure matters on mesh, since you can start light and add pressure only if needed. The size gives room for a back name and number without folding the jersey.
Check dimensions before you order, since it needs a stable table and room to open upward.
How do you protect the platen and the jersey during pressing?
Use a Teflon sheet on top and a clean sheet under the fabric. Those sheets reduce shine marks, stop adhesive bleed, and speed cleanup.
A best heat press platen cover can also protect the platen. Wipe the platen only when cool and follow maker care steps, since a dirty platen can mark light polyester.
If the control box fails, see best heat press control box replacement before assuming the press is done.
Can screen printing work on a jersey instead of heat press?
Yes, screen printing can work on a jersey, but it suits a different kind of job. It shines when you print the same design on many garments in one or two colors.
The Speedball Fabric Screen Printing Ink Starter Set includes six 4 ounce jars in black, white, red, yellow, blue, and green. The water based ink cleans up with soap and water and becomes permanent after heat setting.
Speedball says it works on cotton, canvas, polyester, blends, linen, rayon, and other synthetics. It suits printing a team logo on a batch of jerseys, since you mix colors, print through a screen, then heat set.
Test polyester first.
The Caydo 23 Pieces Screen Printing Starter Kit includes three wood frames with mesh in 10 x 14, 8 x 12, and 6 x 10 inches. It also has two squeegees, A4 transparency film, an ink knife, masking tape, and wood mixing sticks.
That set suits a beginner learning screen printing at home. For one name and number, heat press vinyl or DTF is faster.
Screen printing pays off when you print the same design across a full team set.
What mistakes should you avoid when you press a jersey?
Do not skip the fabric check, do not guess the temperature, and do not press over seams without a test. Those mistakes cause most failed jersey transfers.
Using a cotton setting on polyester can leave a shiny box. Peeling a cold peel transfer hot, or a hot peel transfer cold, also breaks the bond.
Do not press over a zipper, snap button, or thick seam without checking pressure. Raised areas take more pressure, so move the design or press in two shorter steps.
Wait at least 24 hours before washing. Wash inside out in cold water and hang to dry, since high dryer heat can weaken the bond.
How do you care for a jersey after heat pressing?
Wash inside out in cold water and hang to dry. That care helps vinyl, DTF, and screen printed designs last longer.
Turn the jersey inside out so the design rubs less. Use cold water and mild detergent, skip bleach, and use low dryer heat only if needed.
Do not iron directly on the design. Iron the inside or use a Teflon sheet over the design on low heat.
After the first wash, check edges and repress a lifted edge for a few seconds at the maker temperature.
How to heat press on a jersey: final checklist
Check the fabric, test the transfer, prepress the jersey, press at the maker settings, peel as directed, and finish with a short second press. That sequence covers the steps that matter most.
Pick the Fancierstudio press for a 15 by 15 inch platen with adjustable pressure for team sets. Pick vinyl for solid names and numbers, DTF for full color, and screen printing for large batches in a few colors.
Before you start, read the transfer sheet, measure placement, and test on a hidden area. Review the DTF and vinyl guides linked above before you press the front.
Frequently asked questions
What temperature should you use to heat press on a jersey?
Use the transfer maker's stated temperature for the exact material, since jersey fabrics vary between polyester, mesh, blends, and cotton. Check the garment label first, test on a hidden area or scrap fabric, and avoid exceeding the lowest limit linked to the fabric or the transfer.
Can you heat press vinyl on a mesh jersey?
Yes, but you need a vinyl made for low temperature and you must test for shine marks or melting. Mesh has holes, so pressure can push the transfer unevenly and leave marks on nearby areas.
Use a Teflon sheet, short presses, and check the result after the fabric cools.
How long should you press a name or number on a jersey?
Follow the transfer instructions for time, which is often a short press rather than a long bake. Start with the maker time, peel in the stated direction, then finish with a brief second press.
If edges lift, add a few seconds rather than raising the temperature by a large amount.
Should you use a heat press or an iron for a jersey?
A heat press gives more even heat and adjustable pressure, which helps on thick or textured jersey fabric. An iron can work for one small transfer, but it is harder to hold steady pressure and temperature.
For names, numbers, and logos, a press is the safer choice.