Cricut Maker vs Maker 3: Is It Worth Upgrading? (November 2026)
Keep the original Cricut Maker if it still cuts your usual materials well, and upgrade to Maker 3 only if you want matless Smart Materials and a newer machine. In this cricut maker vs maker 3 comparison, the main gain is how materials load and run, not a full change in what you can make.
On this page (12 sections)
- Cricut Maker vs Maker 3 side by side
- How do Maker and Maker 3 handle materials?
- What does matless cutting mean in real use?
- Which tools decide what each machine can make?
- How does fabric cutting compare?
- Which machine suits long vinyl and iron on runs?
- How do size and desk space compare?
- What about speed and accuracy?
- How do setup and Design Space use compare?
- What care keeps either Maker cutting well?
- When should you upgrade, and when should you wait?
- Final verdict on cricut maker vs maker 3
Keep the original Cricut Maker if it works well; choose Maker 3 for matless Smart Materials and longer runs. In this cricut maker vs maker 3 guide, the upgrade question is less about basic cutting power and more about how you load materials, how much desk space you use and what you cut most days.
Our score weighs specs, features and buyer feedback against what you are shopping for. We compared the two machines on material handling, tool use, size, setup and care, then checked which add on tools help each workflow most.
If you are still choosing a category, our guide to craft cutting machines explains how cutting machines differ from printers and presses. That context helps you see why a Maker class machine is a tool platform, not a single blade cutter.


Cricut Maker vs Maker 3 side by side
Maker 3 is the better pick for Smart Materials; the original Maker remains strong for mat based cutting. The table below keeps the focus on the points that change daily use.
| Point | Cricut Maker | Cricut Maker 3 |
|---|---|---|
| Main strength | Flexible tool system on mats | Matless Smart Materials and longer cuts |
| Best for | Fabric, paper and mixed mat work | Vinyl, iron on and repeat long designs |
| Material loading | Mat based for most materials | Smart Materials can run without a mat |
| Tool range | Rotary, knife, pens and more with right tools | Similar Maker line tools, check fit by tool |
| Buying new today | Often found used or as older stock | Often sold as a current bundle option |
| Product | Best for | Compatible devices | Sheet size | Item weight | Our score |
|---|---|---|---|---|---|
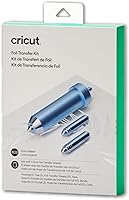
| Cricut Foil Transfer Kit | shiny card details | Cricut Maker, Cricut Explore | 4 x 6 in | 3.2 ounces | 9.7 |
| Cricut Maker | a newer bundle | Design Space app, Inkjet printers | 9.6 | ||
| Cricut Maker® 5 Essential Bundle + Digital | a full starter bundle | 25 pounds | 9.5 | ||
| Sophia’s DESING Rotary Blade+Drive Housing Works for Maker | fabric cutting | Cricut Maker, Cricut Maker 3 | 0.04 kg | 9.2 |
How do Maker and Maker 3 handle materials?
Both machines cut a wide range, but Maker 3 changes how Smart Materials load. That change matters most if you cut vinyl and iron on in long strips.
The original Maker relies on mats for most work. You choose a mat strength for the material, stick the material down, load the mat and let the machine cut.
This setup gives you control with fabric, paper and specialty sheets.
Maker 3 adds matless cutting for Smart Materials. The machine can feed a Smart Vinyl or Smart Iron On strip directly, which suits long words, borders and repeat designs.
You still use mats for many other materials.
For a first purchase, our best cricut maker bundle guide shows how bundle contents can change the value of either machine. A bundle with mats, blades and sampler materials can save separate trips to buy basics.
What does matless cutting mean in real use?
Matless cutting saves mat steps, not every step in a project. You still design, mirror iron on when needed, weed small parts and apply transfer tape.
With Smart Materials, the strip feeds through the machine and cuts to the length you set. That works well for a long banner phrase or a run of labels.
You also avoid sticking and peeling a large sheet on a mat.
Mat based cutting still has a place. Fabric, cardstock, stencil material and specialty sheets give you a flat, gripped surface.
A worn mat can cause shifting, so mat condition matters as much as machine age.
Think about your usual project length. If most designs fit on a 12 in mat and you cut fabric often, matless cutting may not change your week.
If you cut long vinyl strips weekly, it can save real time.
Which tools decide what each machine can make?
The tool you load matters more than the machine name for many projects. A fine point blade handles paper and vinyl, while specialty tools open fabric, scoring, foil and engraving work.
The original Maker built its name on a deep tool range. Rotary blades cut fabric, knife blades cut thicker material and pens, scoring tools and foil tools add detail.
Each tool has its own housing, settings and material rules.
Maker 3 sits in the same Maker family, so many projects carry over. Still, you should check each tool for fit and settings on your exact machine.
Tool compatibility is a detail worth confirming before you order a new blade or housing.
Foil work is a good example. The Cricut Foil Transfer Kit is listed for Cricut Maker and Explore machines, with 3 interchangeable tips and foil sheets in gold and silver.
It adds shine to cards without heat, which suits flat card projects.
How does fabric cutting compare?
Fabric work favors the machine and tool pair you trust, plus the right grip mat. A rotary blade helps with unbacked fabric, while bonded fabric can work with other blades.
The original Maker is a common pick for fabric because rotary cutting avoids a blade dragging in one direction. You still need a FabricGrip mat and a design that suits the fabric weight and weave.
Maker 3 keeps fabric cutting in range for owners who switch between fabric and vinyl. If your main work is quilting squares, applique and sewing projects, test your exact fabric with the tool you plan to use.
The Sophia’s DESING Rotary Blade+Drive Housing Works for Maker is listed for Maker and Maker 3, with a stainless steel rotary blade. It targets delicate and unbacked fabrics such as lace, felt, silk and denim, according to its product details.
Which machine suits long vinyl and iron on runs?
Maker 3 has the clear edge for long Smart Material runs. That edge grows stronger as design length grows.
A long phrase on a mat needs mat space and careful placement. With Smart Materials, you can set a longer cut length and let the strip feed through.
This suits shop signs, wall words, shirt lettering and repeat borders.
Check the material type before you assume matless cutting applies. Smart Vinyl and Smart Iron On are made for that feed path.
Other vinyl and heat transfer vinyl may still need a mat, depending on the type and backing.
Weeding time does not vanish. Long cuts with small letters still take patience, and transfer tape helps you move vinyl without stretching it.
Plan for weeding tools and transfer tape in either machine.
How do size and desk space compare?
Measure your desk and storage shelf before you choose, since both machines need a flat, clear surface. A 12 in cutting width needs room for mats, materials and finished pieces around the machine.
Keep the machine on a stable surface with room for the mat to move in and out. A crowded desk can bend results as a long sheet leaves the machine.
Leave space at the back for material to extend.
Weight and shape matter for storage. If you tuck the machine away after each session, a lighter setup and fewer parts help.
If it stays out, a dedicated spot with a dust cover works better.
Our sister guide on cricut maker vs maker 4 may help if you are comparing a new purchase with a newer generation. Bundle contents and tool fit can matter more than small size differences.
What about speed and accuracy?
Both machines are precise enough for most craft work; setup quality often affects results more than brand generation. Correct blade depth, mat grip and material choice shape the cut.
A dull fine point blade can tear small details on any machine. A loose mat can shift a sheet during a cut.
A wrong material setting can force the blade too deep or too shallow.
Maker 3 owners often value the feed path for Smart Materials, which can keep long cuts straighter than a poorly stuck mat. That does not remove the need for test cuts.
Run a small test with your exact material and tool before a big project. Change one setting at a time, then check corners, small letters and curves.
Keep a note of settings that work for your paper, vinyl and fabric.
If you plan to print first and cut second, our guide to how to use cricut maker 3 covers the Print Then Cut workflow in more detail. For choosing a device for that workflow, see sticker printer and cutter options.
How do setup and Design Space use compare?
Both machines use Design Space, so your computer, phone and internet setup matter. A stable connection and a supported device keep setup simple.
Register the machine, install or open Design Space and pair the machine as directed. Choose the right machine type in the app before you cut.
That step prevents wrong settings and tool prompts.
New owners should budget time for a first test project. Cut a simple shape in cardstock or vinyl, check the edges and adjust blade depth if needed.
This test teaches you more than a long setup video.
If you are moving from an older machine, keep your old mats and tools separate until you confirm fit. Label each item by machine type, then test one tool at a time.
For a newer workflow, our guide on how to use cricut maker 4 shows how steps can shift across generations. Similar logic helps you learn Maker 3 without guessing at each prompt.
What care keeps either Maker cutting well?
Clean mats, replace dull blades and store tools dry, and either machine will stay useful for years. Most cut quality problems start with supplies, not the motor.
Wash mats only in the way Cricut directs for that mat type, then let them dry flat. Do not use heat to restore grip.
When a mat no longer holds material, replace it rather than forcing a cut.
Store blades in their housings or cases. Keep foil tips, pens and rotary blades away from moisture.
A quick wipe of the rail and sensors, following the manual, helps the carriage move cleanly.
Swap a fine point blade when edges look rough or small cuts tear. Keep a spare blade in your kit if you cut often.
The Cricut Maker® 5 Essential Bundle + Digital shows how a full bundle can include tools, materials and digital content for owners who want a complete starter set.
When should you upgrade, and when should you wait?
Upgrade when matless cutting, longer runs or machine wear will affect your next projects. Wait when your current Maker cuts cleanly and your mats and blades are fresh.
Pick Maker 3 if you cut Smart Vinyl or Smart Iron On weekly, make long designs, or want a newer machine with current bundle support. Pick the original Maker if you mainly cut fabric, cardstock and mat based materials and your machine still performs well.
Refurbished or older stock can be a good value, but check the return policy, warranty terms and included parts. A missing mat, blade or tool housing adds cost fast.
Use this rule: if a new blade and a new mat fix your cut quality, keep the original Maker. If your projects keep outgrowing mat length or you want matless feeding, upgrade to Maker 3 and plan for Smart Materials, spare mats and the tools you will use most.
Final verdict on cricut maker vs maker 3
Choose Maker 3 for matless Smart Materials and long cuts; keep the original Maker for mat based fabric and paper work that still cuts well. In this cricut maker vs maker 3 decision, your material habits matter more than the model name alone.
Start with the projects you make most. List your top 5 materials, note which need a mat and mark any long designs.
That list will point to the machine that fits your desk, your tools and your budget.
If you are buying new and want to compare the next generation, read our cricut maker vs venture guide for a wider format option. For a Maker family upgrade, Maker 3 is the focused choice for Smart Materials and longer runs.
Frequently asked questions
Is the Cricut Maker 3 worth upgrading from the Cricut Maker?
It depends on your materials. If you mainly cut vinyl, iron on, cardstock and fabric on mats, a healthy original Maker may still suit you.
If you want matless Smart Materials, longer cutting runs and a newer machine, Maker 3 is the better upgrade.
Can Maker 3 cut materials the original Maker cannot?
Both machines in the Maker line are built for a wide material range with the right tools. The practical difference is often how Smart Materials feed without a mat, and how long a cut can run.
Check the exact tool and material pair before you buy an add on.
Do Maker tools work in Maker 3?
Many Maker line tools are shared across the family, but fit and settings can vary by tool type. Confirm that a blade, pen or attachment is made for your exact machine before you load it.
A housing made for one generation may not seat the same way in another.
Should I buy Maker 3 or a newer Maker model?
Compare the newer model first if you are buying new today. Our cricut maker vs maker 4 guide covers the next step up, and a shop that still sells new Maker 3 stock may offer better value.
Your decision should rest on bundle contents, warranty terms and return policy.
What do I need to start with Maker 3?
You need a compatible computer or mobile device, the Design Space app, materials and the right mat or Smart Material setting. Add a weeder, transfer tape and a fine point blade for basic vinyl and cardstock work.
Keep spare blades and mats in your budget.