How to Use Cricut Explore 3
To use Cricut Explore 3, connect it through Bluetooth, open Design Space, load a mat with material, run the cut, and weed the result. Start with a simple project, check the material setting before each cut, and let the machine finish before you unload the mat.
On this page (13 sections)
- What is Cricut Explore 3 and what can it make?
- How do you set up Cricut Explore 3 for the first time?
- How to use Cricut Explore 3 in Design Space step by step
- How to use Cricut Explore 3 step by step for your first project
- What settings should you use for vinyl, iron-on, and cardstock?
- How do you weed and finish a cut cleanly?
- How do you add foil and other finishing touches?
- Which accessories are worth adding to an Explore 3 setup?
- How do you clean and store your machine and mats?
- What mistakes should you avoid with Cricut Explore 3?
- How does Explore 3 compare with newer Explore models?
- Should you buy the Explore 5 Essential Bundle instead?
- How to use Cricut Explore 3: your closing checklist
To use Cricut Explore 3, connect it through Bluetooth, open Design Space, load a mat with material, run the cut, and weed the result. This guide covers setup, material prep, cutting, weeding, and care.
It also covers accessories that help and checks to use when a cut goes wrong.
What is Cricut Explore 3 and what can it make?
Cricut Explore 3 is a 12-inch smart cutting machine that cuts, writes, scores, and foils. It connects by Bluetooth to a phone, tablet, or computer through the free Design Space app.
Use it for decals, stickers, cards, labels, iron-on designs, and paper shapes. Interchangeable tools let the same machine switch tasks.
Standard tools handle vinyl, iron-on, cardstock, and paper well. Check compatibility before you buy thicker stock.
If you are still choosing, our guide to craft cutting machines compares size, tools, and material range. For a larger-format option, compare Maker and Venture.
How do you set up Cricut Explore 3 for the first time?
Place the machine on a flat, stable surface with room for the mat to feed in and out. Plug it in and switch it on.
Open Design Space on your device and pair the machine through Bluetooth. Design Space will prompt you to load a tool and a mat for a practice cut.
Choose a simple design from the free library for your first run. A basic shape or short word weeds more easily than a detailed image.
Confirm your device meets current system needs and keep Design Space updated. Prompts and material settings can change between versions.
How to use Cricut Explore 3 in Design Space step by step
The order in Design Space is always design, material, mat, load, cut, and unload. Check each step before you press the flashing button.
Add or upload a design and size it to fit your material. Set mirror for iron-on and materials that need a flipped cut.
Keep the design inside the material area on the canvas.
Choose the setting for your exact stock. Design Space uses it to set blade pressure and speed.
Place material smooth and straight on a clean mat, then load it under the rollers.
Press the flashing button, wait for the machine to finish, then press unload. Peel material from the mat at a low angle.
How to use Cricut Explore 3 step by step for your first project
Start with a small, forgiving project, such as a one-color vinyl design with letters at least an inch tall. Cut it, unload the mat, and check the edges before you remove the material.
Clean cuts show the setting and blade work well. Ragged edges point to a dirty blade, weak mat grip, or a setting that is too low.
If the blade is worn, compare replacement blades for Cricut Explore. Weed waste from the outside toward the center, keeping pieces flat on the mat.
For multi-color work, cut each color separately and layer them in order. Add transfer tape for decals that must move as one piece, smoothing it slowly and peeling back at a flat angle.
How do you prepare materials before cutting?
Prepare materials by trimming them square, matching the mat to the material, and pressing them down with no bubbles. A crooked sheet cuts crooked, and bubbles can shift during the pass.
Use mat grid lines to line up material. Press from the center outward.
Light materials need light grip, while heavier cardstock needs stronger grip.
Keep the clear cover on mats when stored. Covers keep dust and scraps off the sticky surface.
For longer projects, use a 12x24 mat to cut in fewer passes. The WORKLION 3-pack gives standard, light, and strong grip mats in 12x24 size.
What settings should you use for vinyl, iron-on, and cardstock?
Use the setting that matches the material on the mat, then adjust one thing at a time. Blade wear and mat grip can change the result from the default.
Vinyl cuts cleanly with a light grip mat and firm press. Iron-on needs mirror and a slightly deeper cut so it weeds without tearing.
Cardstock needs firm grip and a setting that cuts fully through without fraying.
If the cut is too shallow, raise the setting a small amount. If it cuts into the backing, lower it.
Change one variable per test.
For thick cardstock or poster board, a strong grip mat holds the sheet steady through long cuts.
How do you weed and finish a cut cleanly?
Weed slowly and keep the design supported while you remove waste. Start with large waste areas, then small interior pieces.
Use good light and a fine-point weeding tool. Pull waste at a low angle and keep the design flat.
Rushing can stretch vinyl or tear thin cardstock.
For iron-on, weed while the design is on the mat, then press following material instructions. For decals, apply transfer tape before you lift the design.
Store finished pieces flat until you apply them. Curl can trap air and make placement harder.
How do you add foil and other finishing touches?
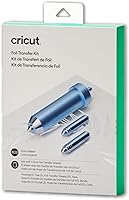
Add foil with a pressure-activated tool, not heat. The Cricut Foil Transfer Kit works with Cricut Maker and Explore machines and has interchangeable fine, medium, and bold tips.
Tape the foil sheet over the card with the shiny side up. Load the housing with the tip for your line weight.
Design Space will prompt the foil pass, and you peel the sheet away when it finishes.
Foil works best on smooth cardstock and simple lines. Very small text can be hard to read, so test a short phrase first.
Plan the foil pass before you weed or fold the card. That order keeps the surface flat and lines crisp.
Which accessories are worth adding to an Explore 3 setup?
A mat variety pack and a foil kit cover most beginner needs. Extra mats let you keep cutting while one rests, and different grips match different materials.
Extra blades are also worth having, as a dull blade causes more failed cuts than almost any other part. Replace it when edges look ragged or cuts stop cleanly.
If you print then cut, Explore 3 can precision-cut around inkjet-printed images for full-color stickers and labels. Our guide on What Printer Works Best with Cricut Projects? helps match a printer to that workflow.
A best Cricut Explore bundle guide helps you check whether bundle tools, mats, and materials fit your project type.
How do you clean and store your machine and mats?
Wipe the machine exterior with a soft, dry cloth after each session. Keep paper dust out of the roller area.
Brush loose scraps from the mat and clean it only by methods the maker allows. Let it air dry fully before you replace the clear cover.
A wet mat under a cover can lose grip faster.
Store mats flat, never bent or rolled. Bending can crack the surface and create a crease.
Inspect blade tip and mat grip each week if you cut often. Check the manual before you open any cover.
What mistakes should you avoid with Cricut Explore 3?
Avoid cutting on a dirty mat, guessing the material setting, or unloading before the machine finishes. These three errors cause most beginner failures.
A weak mat grip lets material shift mid-cut. A wrong setting cuts too shallow or too deep.
An early unload can tear small pieces. Wait for the prompt every time.
Avoid stacking designs too tightly on the canvas. Overlapping designs can confuse the cut path and make weeding harder.
Leave space between shapes.
Avoid buying thicker materials before you confirm the tool and setting. Some materials need a separate deep cutting tool or a different machine class.
How does Explore 3 compare with newer Explore models?
Explore 3 sits in the middle of the Explore line. Newer models keep the 12-inch width and Bluetooth setup but change speed, design, and tool handling.
If you own an Explore 3, you may not need to upgrade for basic vinyl and cardstock work. Compare speed and tool options only if you cut thick materials often or make large batches.
Our guide to how to use Cricut Explore Air 2 covers the older model, while how to use Cricut Explore 4 and how to use Cricut Explore 5 cover newer ones. For fabric, leather, or foam, compare with how to use Cricut Maker 3 before you buy tools or stock.
Should you buy the Explore 5 Essential Bundle instead?
The Cricut Explore 5 Essential Bundle suits new owners who want materials and digital content in one box. It includes Smart Vinyl, Smart Iron-On, Value Cardstock, Insert Card Sets, and Printable Vinyl, plus premium digital images and a font.
Explore 5 cuts 100 or more materials and makes full-color stickers through print-then-cut. It is about 30% more compact than earlier models, with a simplified interface and snap-in pen holder.
Choose the bundle if you want to start right away. Choose machine-only if you already own mats, tools, and vinyl.
The bundle makes most sense when you will use the included materials and content.
Blade care habits carry over between machines. A guide to best Cricut Maker replacement blades is useful if your household runs both Maker and Explore machines.
How to use Cricut Explore 3: your closing checklist
Keep this checklist beside the machine: design, material, mat, load, cut, unload, weed. Check the setting before every pass and never unload early.
Pick the light, standard, or strong grip mat that matches your material. Cut a small test first on new stock.
Replace a dull blade before a large batch.
Start with vinyl or cardstock, add foil once basics feel easy, and save thick materials for later. With clean mats and the right setting, Explore 3 gives repeatable results.
Frequently asked questions
What is Cricut Explore 3?
Cricut Explore 3 is a 12-inch smart cutting machine for vinyl, iron-on, cardstock, paper, and other materials. It connects to a phone or computer through Bluetooth and works through the free Design Space app.
You load material on a cutting mat, choose a setting, and the machine cuts or writes the design.
How do I start a first cut on Cricut Explore 3?
Open Design Space, add a simple design, place material firmly on a clean mat, and choose the matching material setting. Connect the machine through Bluetooth, load the mat into the rollers, press the flashing button, and wait for the cut to finish before unloading.
What materials can Cricut Explore 3 cut?
Explore 3 handles popular materials such as vinyl, iron-on, cardstock, printable materials, and paper. Thicker or denser materials may need a different tool or a separate deep cutting tool.
Always match the material and mat to the setting in Design Space for the cleanest result.
Why is my Explore 3 cut not clean?
A dull blade, weak mat grip, wrong material setting, or loose material can cause tearing or incomplete cuts. Clean the mat, press material down evenly, confirm the setting, and check the blade area.
Make a small test cut before you repeat a large project.