What to Look for in a Vinyl Cutter with ARMS
A vinyl cutter with arms is worth choosing when you cut printed vinyl, stickers or contour designs, because ARMS reads registration marks and follows the printed outline. If you only cut plain vinyl, a standard sensor cutter is usually enough. Check sensing, cutting force, mat size and software before you buy.
On this page (12 sections)
- What is ARMS and why does it matter for printed vinyl?
- How does contour cutting change your workflow?
- Does your work need a vinyl cutter with arms or a standard cutter?
- What should you check in registration sensing?
- How much cutting force and speed do you need?
- What mat, sheet size and feed path should you plan for?
- Which software and design tools work best with sensing?
- How do you compare sensing cutters with craft machines?
- What tips and tools do you still need after you buy?
- What common mistakes cause off-line cuts and wasted sheets?
- Can inkjet printing fit into a print and cut workflow?
- How should you decide before you buy a vinyl cutter with arms?
A vinyl cutter with arms is built for printed work, not just plain vinyl. ARMS is short for Automatic Registration Mark Sensing, and the sensor searches for marks on the printed sheet.
That lets the machine cut around a printed design instead of cutting a plain rectangle.
You need that function when you make stickers, labels, decals or printed transfers. The sheet goes in printed, the machine finds the marks, and the blade follows the outline.
If your work is plain vinyl shapes and letters, ARMS adds cost with little use.
This guide explains what to check before you buy. We compared specs across craft cutting machines and looked at how sensing, force, mats and software affect everyday results.
Use it to match the cutter to the work you actually make.
What is ARMS and why does it matter for printed vinyl?
ARMS matters because printed vinyl must stay aligned from print to cut. A small shift can push the blade off the outline, even if the cut itself is clean.
A sensor cutter reduces that risk by reading marks placed on the sheet.
Registration marks are usually small crosses or circles printed near the design. The cutter scans for them, notes their position, and adjusts the cut path.
That is contour cutting in practice.
This differs from cutting plain vinyl. Plain vinyl has no printed outline to follow, so the machine just cuts the shape in your file.
With printed vinyl, the file and the sheet must match, and ARMS helps find that match each time.
Check how the sensor works before you buy. Some systems need marks in a set position, some need a white border, and some need you to confirm the scan.
Those rules shape how you design sheets and how much blank space you leave.
Rule: choose ARMS if printed sheets are regular work, and skip it for plain vinyl only.
How does contour cutting change your workflow?
Contour cutting changes the order of your work. You design, print, sense, then cut.
Each step can add time, and each step must stay accurate.
Design with the cut in mind. Leave space for registration marks, keep shapes from touching the sheet edge, and avoid tiny details a blade cannot follow cleanly.
Test one sheet first, then check the cut under good light.
Print quality matters too. Marks must be dark, sharp and complete.
A faded mark or a warped sheet can confuse the sensor. If you use an inkjet printer for vinyl, read Can I Print On Vinyl With An Inkjet Printer? before you plan a print and cut workflow.
Load the sheet straight. A crooked or curled sheet can shift the scan and feed unevenly.
Use a mat when the maker calls for one, smooth the sheet down, and keep the leading edge square to the rollers.
Rule: build your sheet design around registration marks, print quality and straight feeding, not around the cutter alone.
Does your work need a vinyl cutter with arms or a standard cutter?
A standard cutter is enough when every cut comes from a plain sheet. Heat transfer vinyl, adhesive vinyl, cardstock and stencil film fall in that group.
The machine cuts the file shape, and no printed outline needs to be followed.
A cutter with arms earns its place when printed outlines drive the cut. Sticker sheets, printed labels, custom decals and printed transfers all need that link between print and cut.
Without sensing, you would have to align the sheet by hand and hope the blade lands in the right place.
Think about volume as well as type. One printed sheet a week is different from a daily stack of sticker sheets.
Higher volume puts more value on repeatable sensing and fewer manual fixes.
Rule: buy sensing for printed outlines, buy a standard cutter for plain material, and do not pay for ARMS you will not use.
When a printer and cutter combo makes more sense
A vinyl printer cutter combo puts printing and cutting in one unit. That setup can suit a shop that prints and cuts the same designs all day.
It also keeps print and cut in one workflow, with one set of size limits.
A separate printer plus a sensor cutter gives more choice. You can pick a printer for color and sheet size, then pick a cutter for force and sensing.
That split helps if you already own a printer or need a wider sheet than a combo allows.
Our guide to a sticker printer cutter machine explains how to weigh those two setups. Match the choice to sheet size, print volume and how often you change designs.
Rule: pick a combo for one tight workstation, and pick separate units when sheet size or printer choice matters more.
What should you check in registration sensing?
Check the sensor type, the mark style and the scan steps. A cutter that scans each mark can correct for slight skew.
A cutter that scans only one mark depends more on straight feeding and may drift on longer sheets.
Look for clear guidance on mark placement. The maker should state the mark size, the border needed and where marks can sit on the sheet.
Vague guidance makes setup harder, especially when you design your own sticker sheets.
Check whether the machine lets you review the scan. A preview or a test cut helps you catch a missed mark before you waste a full sheet.
Some systems ask you to confirm the sensor reading, and that pause is worth having.
Also check material limits. Printed vinyl, sticker paper and label stock have different thickness and backing.
A sensor cutter should name the materials it can sense and cut, not just claim it handles printed work in general.
Rule: choose a system that scans each mark, shows the result and states its mark and material limits in plain terms.
How much cutting force and speed do you need?
Cutting force controls how cleanly the blade cuts through material. Too little force leaves thick material joined at the edges, while too much can tear thin vinyl or push it out of shape.
Set force for your thickest regular material, with room to adjust by material. Speed helps on long straight runs, but too much speed can hurt corners and small curves.
A cutter that slows for tight turns handles script letters and sticker outlines better. Check blade and tool options too, since fine points suit detailed work.
Other tools may be needed for thicker stock or special effects. The Cricut Foil Transfer Kit for Cricut Maker and Cricut Explore machines shows this well.
It has interchangeable fine, medium and bold tips for foil work on cards and invites.
Different tips suit different line weights, and the same idea applies to blades. Match the tool to the detail in your file before you change force or speed.
The kit is pressure activated and needs no heat, which shows that the right tool matters as much as the machine.
Rule: set force for your thickest material, use speed for straight runs, and slow down for fine curves and small text.
What mat, sheet size and feed path should you plan for?
Sheet size decides what you can make. A cutter that takes a 12 in sheet suits small stickers and decals.
A wider cutter suits larger signs and full-width printed sheets. Measure your largest printed sheet before you shop, not your smallest test sheet.
The feed path matters for printed work. The sheet must move straight, stay flat and clear the rollers without bending.
A curled sheet or a sheet with a raised edge can shift the scan or jam the feed.
Mats add support for thin or printed sheets. A clean mat holds the sheet flat and keeps it aligned.
A worn mat that loses grip can let the sheet move during the cut, which is a common cause of off-line contour cuts.
Check the maximum material width and the printable area separately. A sheet may fit the cutter but leave too little room for marks and borders.
Plan the printable area, not just the sheet size.
Rule: plan for your largest sheet, a flat feed path and a clean mat before you judge any cutter on speed.
How to set up a sheet for a clean contour cut
Start with a test sheet that uses your real printer, paper or vinyl and your real design. Print the registration marks at full size and check that every mark is dark and complete.
Reload the sheet and run one outline before you cut a full row.
Keep outlines away from the sheet edge by the margin the maker requires. That margin protects the sensor reading and gives the blade room to complete the cut.
If a design sits too close to the edge, move it or shrink the sheet layout.
After the test cut, lift one piece and check all sides. A cut that is clean on one side and ragged on another often points to force, blade condition or sheet movement.
Change one setting at a time so you know what fixed it.
Rule: test one full-size printed sheet first, then adjust force, blade or alignment based on that single result.
Which software and design tools work best with sensing?
Software controls the link between print and cut. You need a way to add registration marks, set cut lines, sort outlines and send the job in the right order.
Some cutters use their own software, while others import files from design programs. Check whether the design tool can place marks automatically, since manual marks work but auto placement reduces errors when layouts change often.
Check whether cut lines and print art stay on separate layers. That split prevents the blade from cutting the wrong path.
Also check file formats and plug-ins. A cutter that imports common vector files will be easier to use with sticker and decal designs, while a closed system may limit how you build sheets or share files.
Look at the preview and test tools. A preview that shows the cut path over the printed design helps you spot a bad line before you cut, and a test cut on scrap printed stock saves full sheets.
Rule: choose software that adds marks, keeps print and cut paths separate and previews the cut before you run it.
How do you compare sensing cutters with craft machines?
Craft cutting machines now range from small home units to wider professional cutters. A small machine can suit stickers, labels and small decals.
A wider machine suits signs and large printed sheets. Read our full guide to craft cutting machines to see where home and pro models split.
Compare sensing first, then size and force. A large cutter without reliable sensing will still miss printed outlines.
A smaller cutter with strong sensing may serve a sticker shop better than a wide unit that needs manual alignment. Check the blade system and tool holders too, since a machine that takes standard blades is easier to maintain.
Our roundup of the best vinyl cutter for stickers shows how sensing, size and force play out for sticker work. Use it as a shortlist, then check each model against your largest sheet.
Rule: rank by sensing quality first, then by sheet size, force and blade choice for your largest regular job.
What tips and tools do you still need after you buy?
A sensor cutter is only part of the setup. You still need finishing tools for weeding, applying and storing finished pieces.
Weeding tools matter most for intricate vinyl and sticker sheets. Small sharp tools help you lift waste material without tearing fine lines.
Our guide to the best vinyl weeding tool can help you pick a set that fits your detail work. Blades also need attention, since a dull or nicked blade can tear edges and leave rough cuts even when sensing is perfect.
Our guide to the best vinyl cutter blades explains how blade type and condition affect the cut. Storage matters when you move between rooms or take the machine to a class or market.
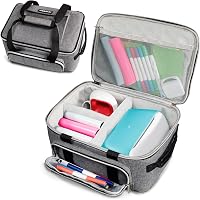
The LEFOR·Z case for Cricut Joy Xtra is made of tear-resistant polyester with thick foam padding, removable dividers and a transparent top pocket for mats and sheets. It also has room for tools, vinyl rolls and supplies.
A smaller option is the VIGEGARI case for Cricut Joy and Joy Xtra, at 13.5 x 5.5 x 10 in, with thick padding, soft lining and a removable divider.
Rule: budget for weeding tools, spare blades and storage at the same time as the cutter.
What common mistakes cause off-line cuts and wasted sheets?
The most common mistake is a weak or misplaced registration mark. A faded print, a mark too close to the edge or a mark covered by the design can send the sensor off course.
Fix the sheet design before you change cutter settings.
A second common mistake is loading the sheet crooked. Even a small angle can shift the cut on the far side of the sheet.
Use the mat guides, keep the edge square and rescan if the sheet moves during loading.
A third mistake is using too much force or speed on fine detail. That can drag thin vinyl, flatten small curves or tear corners.
Slow the cut for detail, and check the blade before you raise force again.
Skipping the test cut is another mistake. A single test sheet can reveal mark, alignment and force problems while the cost is still low.
A full batch will repeat the same error on every piece.
Rule: fix marks, alignment, blade and force in that order, and always run a test sheet before a full batch.
Can inkjet printing fit into a print and cut workflow?
An inkjet printer can fit into a print and cut workflow when the material and ink suit the job. The key limits are material coating, ink drying, color fastness and sheet flatness.
Check the vinyl or sticker stock first. Some stock is made for inkjet printing, and some is made for laser or solvent printing.
The wrong stock can smear ink, curl in the printer or fade after the cut.
Read Can Inkjet Printers Print On Vinyl? when you plan that pairing. Sheet flatness matters for sensing, so let printed sheets dry and flatten before you load them.
A sheet that curls after printing can shift in the cutter feed. Keep sheets away from heat and damp air, and print a proof with marks to check contrast under bright light before a large run.
Rule: pair an inkjet printer with inkjet-ready stock, dry and flatten sheets, and proof marks before you cut a batch.
How should you decide before you buy a vinyl cutter with arms?
Decide by your printed work first. List the sheets you print, the largest size, the materials and the detail level.
That list will tell you whether sensing, width, force or software matters most.
Then match the cutter to that list. Choose ARMS when printed outlines are routine.
Choose width for your largest sheet. Choose force for your thickest material.
Set a simple order of checks. Confirm sensing and mark rules, confirm sheet size and printable area, confirm force and blade options, then confirm software and tool support.
A cutter that fails the first check is not a good buy for printed work.
This guide covered a vinyl cutter with arms as a print and cut system, not just a blade on a rail. Sensing, sheet design, force and software must work as one setup.
Pick the setup that fits your printed sheets and test it with one sheet.
Rule: buy the cutter that senses your marks, fits your largest sheet and previews the cut, then test it before a full batch.
Frequently asked questions
What does ARMS mean on a vinyl cutter?
ARMS means Automatic Registration Mark Sensing. The cutter uses a sensor to find printed registration marks, then it cuts around the printed design.
It helps with contour cutting for stickers and printed decals.
The printed sheet must include clear marks and feed straight through the machine.
Do I need ARMS for plain vinyl?
No. ARMS is for printed material that must be cut to a shape.
Plain vinyl, cardboard and cardstock do not need registration sensing.
A standard cutter can handle those jobs if it has the right blade, force and mat size.
Pay for ARMS only when printed work is part of your plan.
Can a vinyl cutter with arms cut without a mat?
Some cutters and materials work without a mat, but many printed sticker sheets need a mat for steady feeding. Check the maker guidance for your exact material and cutter.
A mat can help keep sheets flat and aligned, which matters for accurate contour cuts.
Is a vinyl printer cutter combo different from a cutter with arms?
Yes. A combo prints and cuts in one unit, while a cutter with arms cuts printed sheets made elsewhere.
A combo suits a single workstation and repeat printing.
A separate printer and sensor cutter can suit larger sheets, different volumes or an existing printer.